Kubernetes has rapidly become a key ingredient in edge computing. With Kubernetes, companies can run containers at the edge in a way that maximizes resources, makes testing easier, and allows DevOps teams to move faster and more effectively as these organizations consume and analyze more data in the field.
Now, containers are transforming the way edge and IoT platforms have been operated and managed in the past. Providing scalability, manageability and the ability to deploy general and multi-purpose applications on these devices drives cloud-like flexibility into the IoT world. At first glance, Kubernetes appears too large and complex for edge and IoT devices, which typically have a smaller resource footprint than in the data center or cloud.
If you are not familiar with Kubernetes , we will have a very in-depth discussion about it in this post. This post documented how I deployed a Hybrid Cross-architecture Kubernetes Cluster with NVIDIA Jetson AGX Xavier and NVIDIA Jetson Nano. Instead of building the traditional Kubernetes , I choose to use k3s, a lightweight, easy to install Kubernetes distribution geared toward resource-constrained environments and low touch operations – particularly edge and IoT environments.
Quick Link: https://kubernetes.io/docs/tutorials (Official Tutorial)
Refrence:
About Kubernetes
Containers are a good way to bundle and run your applications. In a production environment, you need to manage the containers that run the applications and ensure that there is no downtime. For example, if a container goes down, another container needs to start.
That’s how Kubernetes comes to the rescue! Kubernetes provides you with a framework to run distributed systems resiliently. It takes care of scaling and failover for your application, provides deployment patterns, and more.
Official Tutorial: https://kubernetes.io/docs/tutorials
Video Tutorial Link: https://youtu.be/aSrqRSk43lY
What is Kubernetes?
Kubernetes (K8s) is an open-source system for automating deployment, scaling, and management of containerized applications.
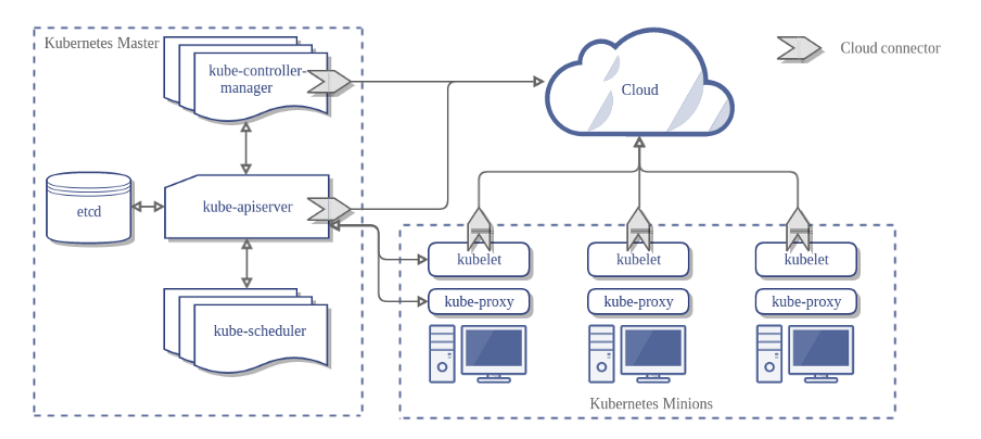
Kubernetes Architecture
What Kubernetes can do for you?
Containerization helps package software to serve these goals, enabling applications to be released and updated in an easy and fast way without downtime. Kubernetes helps you make sure those containerized applications run where and when you want, and helps them find the resources and tools they need to work. Kubernetes is a production-ready, open source platform designed with Google’s accumulated experience in container orchestration, combined with best-of-breed ideas from the community.
Why Kubernetes on the Edge?
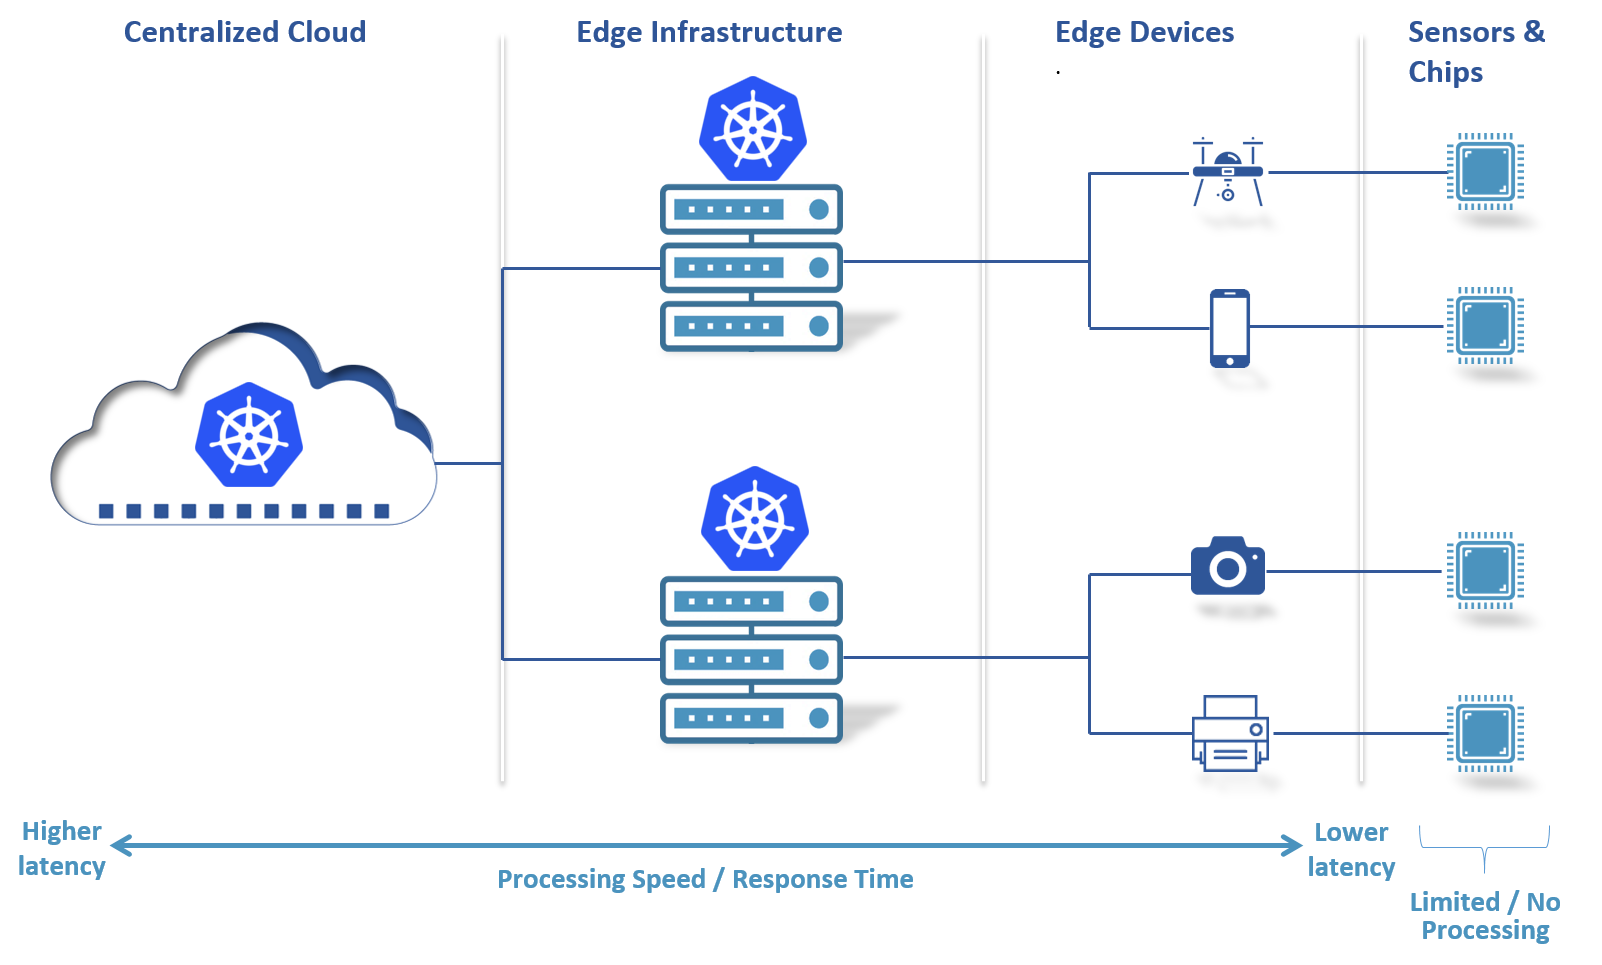
Kubernetes is becoming the de facto orchestration for enterprise containers. The next challenge is to take the same, powerful model to the edge, and K3s makes containers edge efficient. How? K3s is purpose-built for the edge, removing millions of lines of code from Kubernetes that aren’t required in edge environments. This makes it incredibly lightweight and easy to deploy in the most remote and unusual circumstances.
One of the major benefits of K3S is how it centralizes the management of vast device estates. Traditionally developed in silos, edge devices were often failure-prone, and managing thousands of individual end-points was onerous. If the master node went down, there was no real way of pushing a coordinated fix to all devices or being able to roll back if something went wrong. In K3s, developers can create a centrally-managed cluster where an entire device estate can be viewed via a single UI. K3s takes the complexity out of updates and roll-backs and crucially is platform-agnostic, so developers find it easier to manage an estate efficiently with little additional engineering.
Deployment
K3S is a lightweight Kubernetes distribution developed by Rancher Labs, perfect for Edge Computing use cases where compute resources may be somewhat limited. It supports x86_64, ARMv7, and ARM64 architectures. I wanted to have an attempt deploying the Kubernetes Worker Node on an NVIDIA AGX Xavier and an NVIDIA Jetson Nano for the GPU capabilities, which might be beneficial with ML/AI workloads.
K3S Architecture
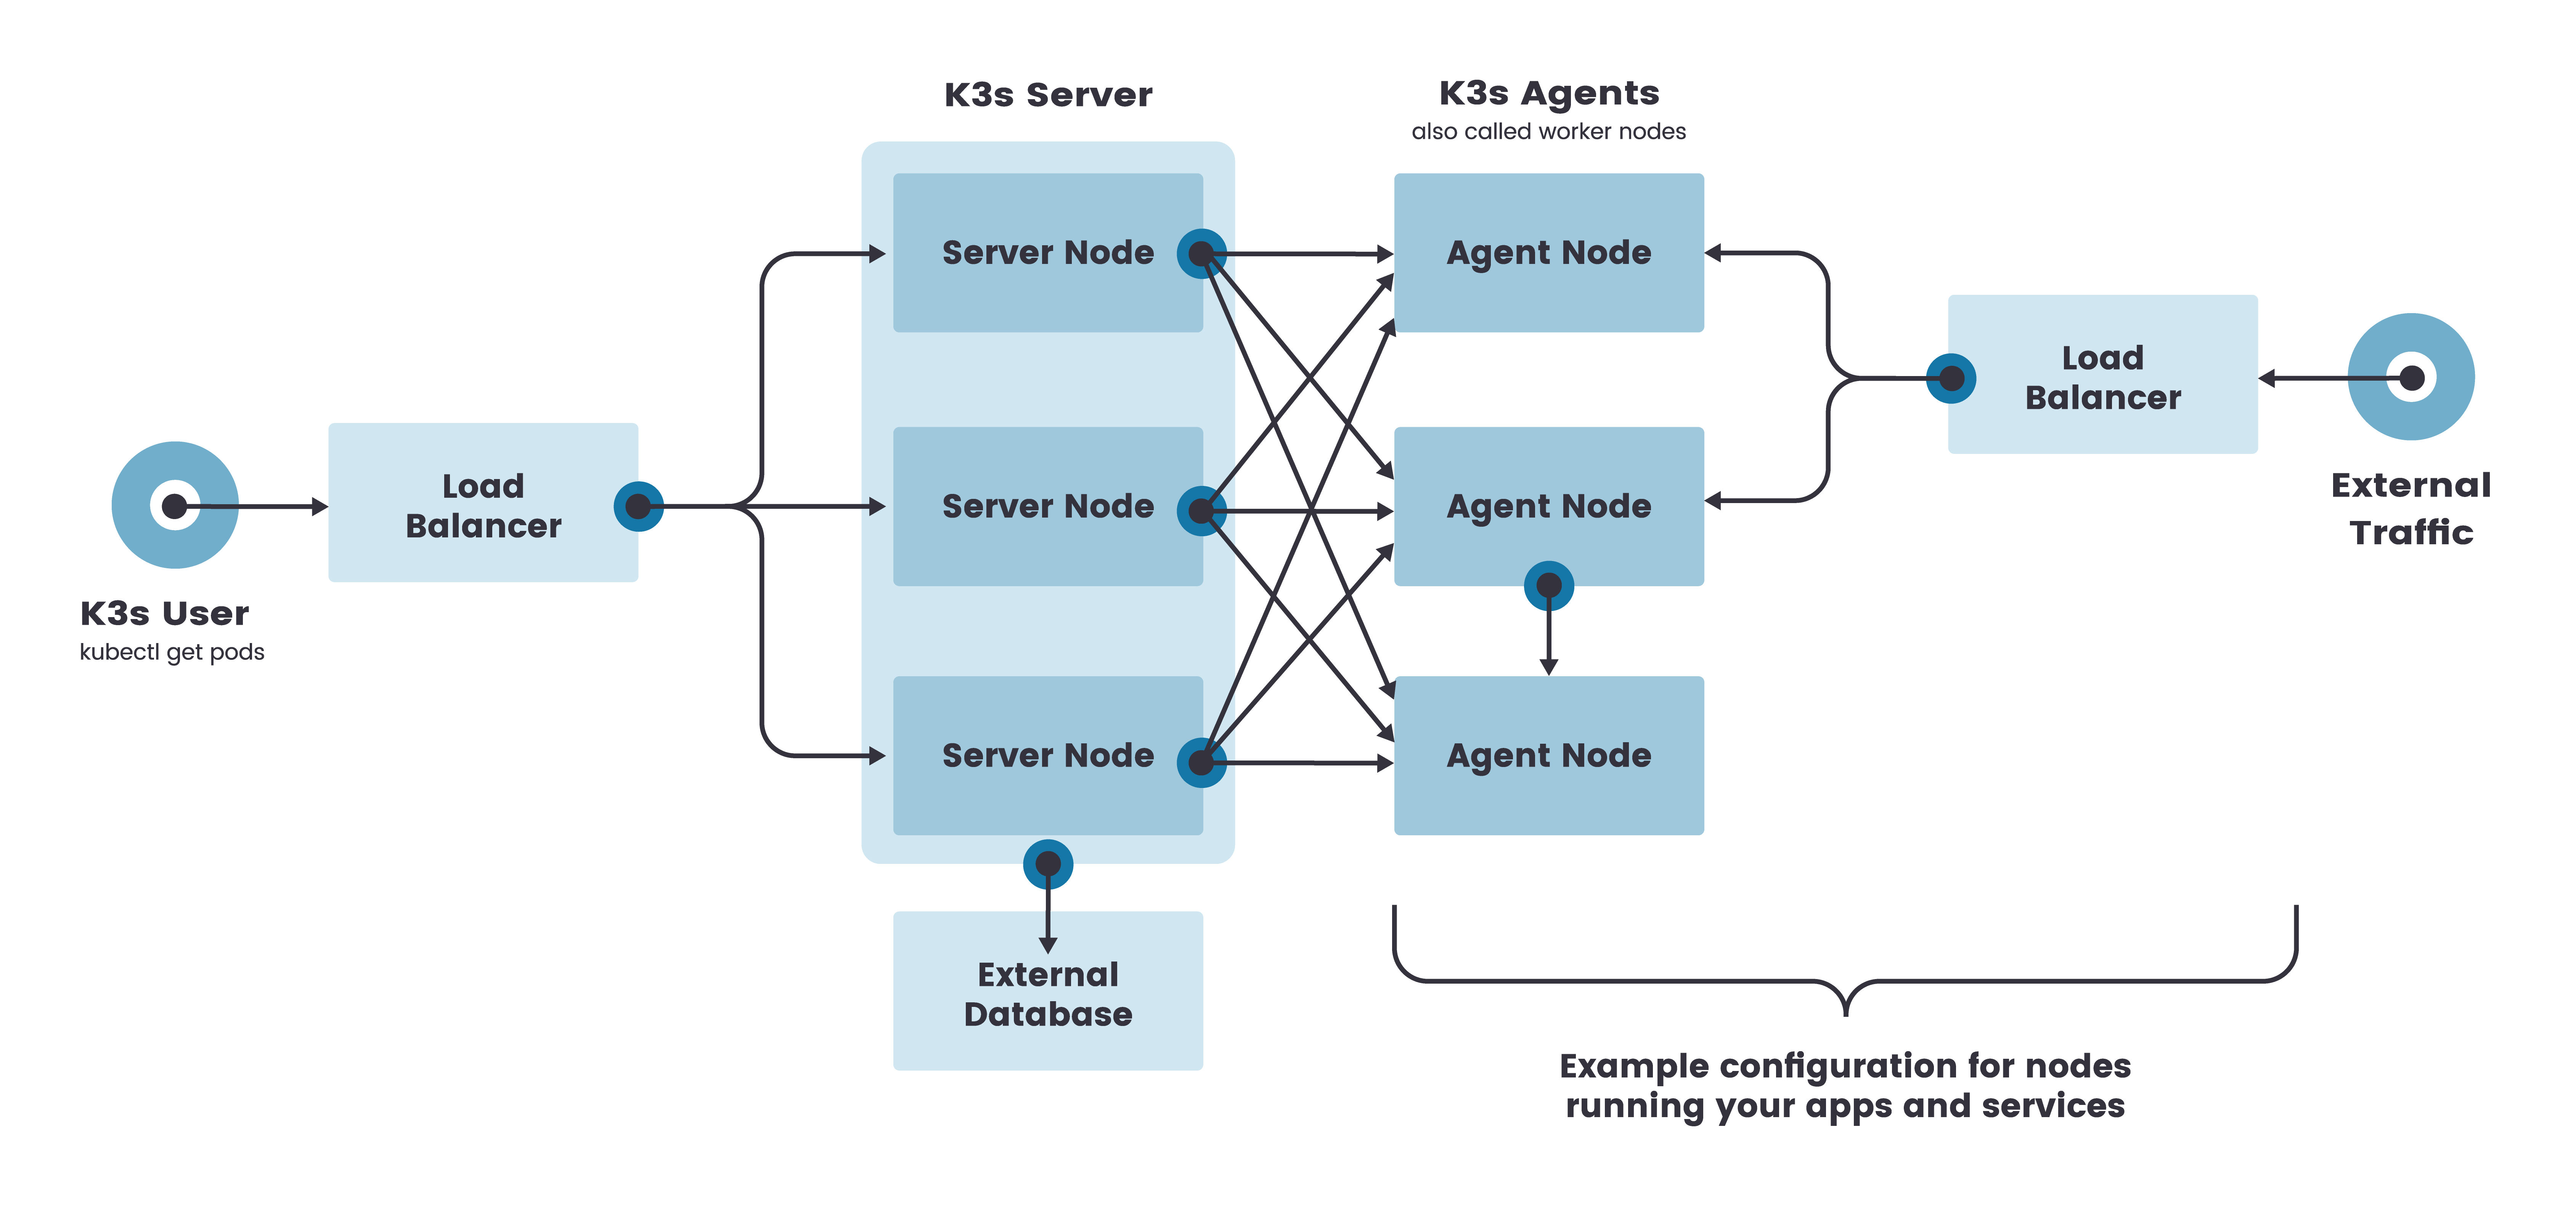
K3S Server (Master)
I deployed a Kubernetes Master on an Ubuntu18.04 VM with my Private Cloud Server running Proxmox OS. The Hardware Specs are listed as follow:
1CPU: 8 Cores Intel i9700K
2RAM: 16G DDR4
3Storage: 100G SSD
4Network Bandwith: 300Mb Ingress; 30Mb Egress
Deployment
Step #1: Switch to the root user, and then check the Internal IP
Make sure you mark the correct Network Interface and its associated IP Address. eg: eth0 » 192.168.1.xx
Step #2: Modify the Network Interface and Export IP Address as a local Bash Variable
1# Modify enp0s8 with your Network Interface
2$ export IPADDR=$(ip a show enp0s8 | grep "inet " | awk '{print $2}' | cut -d / -f1)
3$ echo $IPADDR
If you have configured and set up correctly, you should be able to see your LAN IP Address in the console
Step #3: Execute the shell command to install
Please modify the Network Interface from enp0s8 to what matched in your system before you execute the installation command. If you fail to identify it, please check the steps above. This step is very crucial, if the network config is messed-up, the Kubernetes Server will not be able to identify the Kubernetes Agent.
1$ curl -sfL https://get.k3s.io | INSTALL_K3S_VERSION=v0.9.1 INSTALL_K3S_EXEC="--docker --node-ip=${IPADDR} --flannel-iface=enp0s8 --write-kubeconfig-mode 644 --no-deploy=servicelb --no-deploy=traefik" sh -
Flags Explanation:
1INSTALL_K3S_VERSION: Specify K3s version
2INSTALL_K3S_EXEC: Set k3s server executable option
3--docker: Set to use Docker as the default container engine for k3s
4--node-ip=${IPADDR}: Set the IP for Master Node
5--flannel-iface=enp0s8: Set the flannel Network Interface for Communication with Worker Nodes. Please make sure you modify enp0s8 to the Network Interface that you find in your device
6--write-kubeconfig-mode 644: Set the permission mode of kubeconfig
7--no-deploy=servicelb --no-deploy=traefik: Set not to deploy packaged components
Step #4: Verify the Installation
Step #5: Create a Secret Token to verify Cluser Nodes (Save it for later usage)
1$ echo "export NODE_TOKEN=$(sudo cat /var/lib/rancher/k3s/server/node-token)"
K3S Agent (Worker Node)
I deployed multiple Kubernetes Worker Nodes across different architectures. Now that K3S supports both X86, AMD64, ARMv8, and ARM64, I chose to deploy three worker nodes on x86-based VM running on my Private Cloud Server. The Hardware Specs are listed as follow:
1CPU: 2 Cores Intel i9700K
2RAM: 2G DDR4
3Storage: 20G SSD
4Network Bandwith: 300Mb Ingress; 30Mb Egress
Then I joined my NVIDIA Jetson AGX Xavier and NVIDIA Jetson Nano to the K3S Kubernetes Clusters. Surprisingly, with the same approach that I joined the X86 Worker Nodes to the Cluster but with ARM-based Edge Devices, it does not have any compatibility issues, working like a charm!
For the Hardware Specs of NVIDIA Jetson AGX Xavier and NVIDA Jetson Nano, pleas visit the Official Site .
Deployment
Step #0: Export the Secret Token generated from K3S Master
1$ export NODE_TOKEN=K10571d20534c867fe6ce8d...
2$ echo $NODE_TOKEN
If you have configured and set up correctly, you should be able to see the Secret Token in the console
Step #1: Switch to the root user, and then check the Internal IP
Make sure you mark the correct Network Interface and its associated IP Address. eg: eth0 » 192.168.1.xx
Step #2: Add master node to hostsname
1$ sudo nano /etc/hosts
2# eg: 10.10.10.78     k3s-master
Step #3: Modify the Network Interface and Export IP Address as a local Bash Variable
1# Modify enp0s8 with your Network Interface
2$ export IPADDR=$(ip a show enp0s8 | grep "inet " | awk '{print $2}' | cut -d / -f1)
3$ echo $IPADDR
If you have configured and set up correctly, you should be able to see your LAN IP Address in the console
Step #4: Execute the shell command to install
Please modify the Network Interface from “enp0s8” to what matched in your system before you execute the installation command. If you fail to identify it, please check the steps above. This step is very crucial, if the network config is messed-up, the Kubernetes Server will not be able to identify the Kubernetes Agent.
1$ curl -sfL https://get.k3s.io | INSTALL_K3S_VERSION=v0.9.1 INSTALL_K3S_EXEC="--docker --node-ip=${IPADDR} --flannel-iface=enp0s8" K3S_URL=https://k3s-master:6443 K3S_TOKEN=${NODE_TOKEN} sh -
Step #5: Verify the Installation
1$ systemctl status k3s-agent
Function Verification
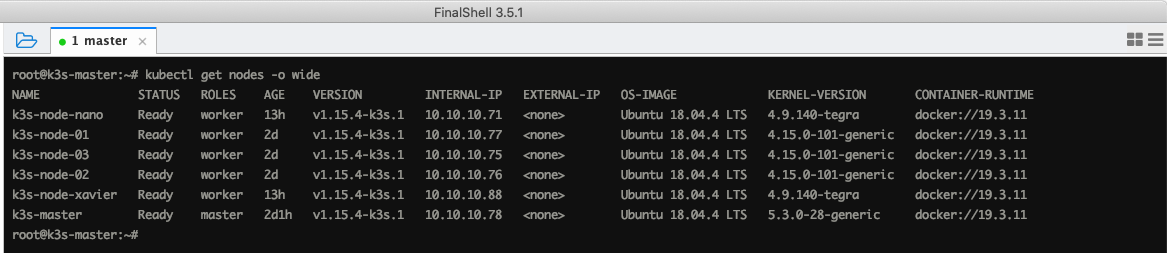
1root@k3s-master:~# kubectl get nodes -o wide
2NAME              STATUS   ROLES    AGE    VERSION         INTERNAL-IP   EXTERNAL-IP   OS-IMAGE             KERNEL-VERSION       CONTAINER-RUNTIME
3k3s-node-nano     Ready    worker   13h    v1.15.4-k3s.1   10.10.10.71   <none>        Ubuntu 18.04.4 LTS   4.9.140-tegra        docker://19.3.11
4k3s-node-01       Ready    worker   2d     v1.15.4-k3s.1   10.10.10.77   <none>        Ubuntu 18.04.4 LTS   4.15.0-101-generic   docker://19.3.11
5k3s-node-03       Ready    worker   2d     v1.15.4-k3s.1   10.10.10.75   <none>        Ubuntu 18.04.4 LTS   4.15.0-101-generic   docker://19.3.11
6k3s-node-02       Ready    worker   2d     v1.15.4-k3s.1   10.10.10.76   <none>        Ubuntu 18.04.4 LTS   4.15.0-101-generic   docker://19.3.11
7k3s-node-xavier   Ready    worker   13h    v1.15.4-k3s.1   10.10.10.88   <none>        Ubuntu 18.04.4 LTS   4.9.140-tegra        docker://19.3.11
8k3s-master        Ready    master   2d1h   v1.15.4-k3s.1   10.10.10.78   <none>        Ubuntu 18.04.4 LTS   5.3.0-28-generic     docker://19.3.11
Check Cluster Nodes information with kubectl
1$ kubectl get no -o wide
Check Cluster Components status with kubectl
1$ kubectl get componentstatus
Check K3S Cluster general information
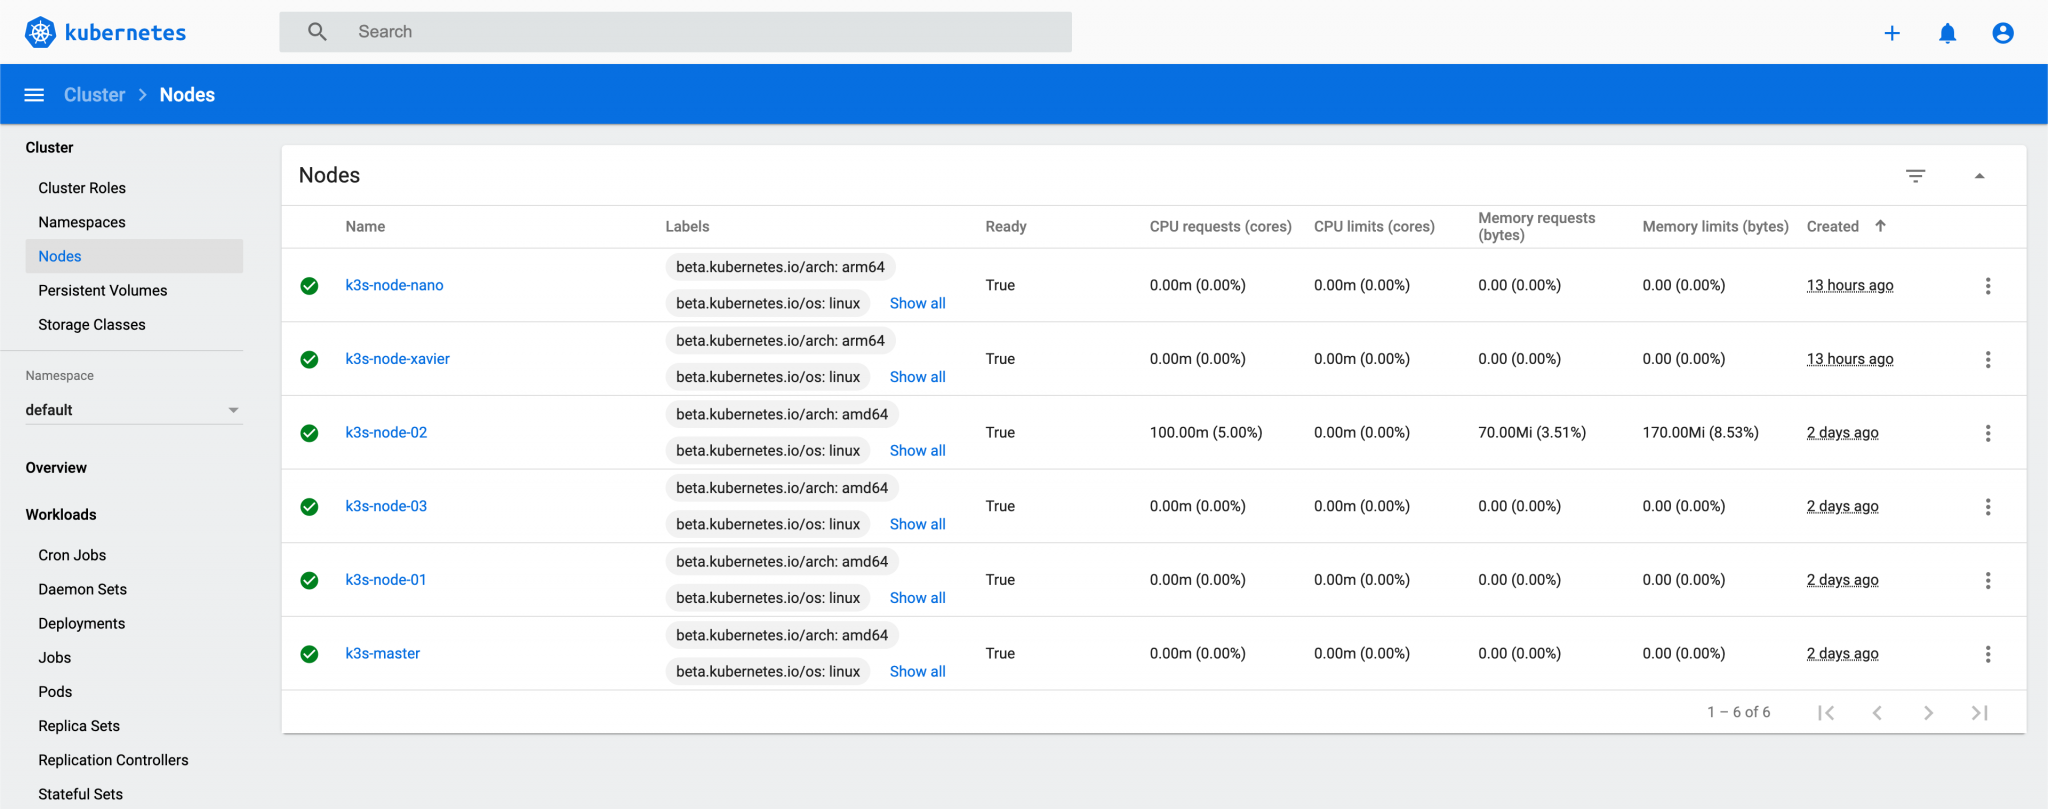
Kubernetes Dashboard
Kubernetes Dashboard is a general-purpose, web-based UI for Kubernetes clusters. It allows users to manage applications running in the cluster and troubleshoot them, as well as manage the cluster itself.
Deployment
Step #1: On the K3S Master, deploy the Kubernetes Dashboard with YAML file
1$ cd ~
2$ wget https://raw.githubusercontent.com/kubernetes/dashboard/v2.0.0/aio/deploy/recommended.yaml --no-check-certificate -O dashboard.yaml
3$ kubectl apply -f dashboard.yaml
Step #2: Check Dashboard Running Status
There are two pods and two services running
1$ kubectl -n kubernetes-dashboard get pods
2$ kubectl -n kubernetes-dashboard get svc
If something goes wrong, you may use the following command to delete the dashboard deployment.
1$ kubectl delete -f dashboard.yaml
Step #3: Modify nodePort, and visir the Dashboard
1$ kubectl patch svc kubernetes-dashboard -n kubernetes-dashboard -p '{"spec":{"type":"NodePort","ports":[{"port":443,"targetPort":8443,"nodePort":30443}]}}'
Step #4: Check the Service running status and the exposed nodePort
1$ kubectl -n kubernetes-dashboard get svc
You should be able to visit the Dashboard @ https://ip:30443
Dashboard User
Create an Authorized User and Grant it the admin rights
Notes: Do the following operations on the K3S Server (Master)
1$ kubectl create serviceaccount dashboard-admin -n kube-system
2$ kubectl create clusterrolebinding dashboard-admin --clusterrole=cluster-admin --serviceaccount=kube-system:dashboard-admin
Check the Dashboard Secret Token
1$ kubectl describe secrets -n kube-system $(kubectl -n kube-system get secret | awk '/dashboard-admin/{print $1}')
Copy & Paste the token to the Dashboard Web UI page, you should be able to log in to the Dashboard. Good Luck !
Uninstall K3S
K3S Server (Master Node)
1$ systemctl stop k3s
2$ /usr/local/bin/k3s-uninstall.sh
K3S Agent (Worker Node)
1$ systemctl stop k3s-agent
2$ /usr/local/bin/k3s-agent-uninstall.sh
Thoughts
I predict not only the increased popularity of Kubernetes but also its establishment as the de facto container distribution. We’re seeing a lot of experimentation with open source projects that are now being rolled into managed services – this will only explode in the next few years. Containers provide a way for technology teams to convert projects into active deployments faster and, crucially, to scale them more rapidly. This is important for edge deployments where we’re talking about tens of thousands of connected devices – IoT will continue to drive the need for innovation at the edge, and Kubernetes will have a major role to play in the evolution of the market.
From an Arm perspective, it’s all about driving self-sustainability into these edge and IoT deployments. As an ecosystem, we’re driving secure and reference platforms that enable development teams to deploy containers in an efficient manner, without spending all of their time on device-management activities.
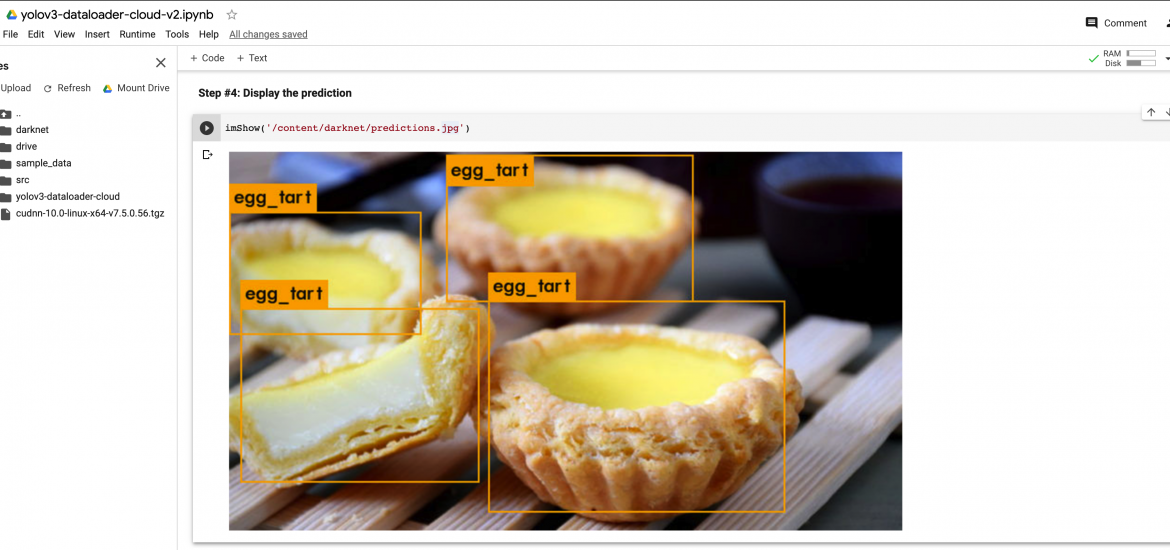
In my future blog post, I will showcase how GPU-enabled Kubernetes Pods can be deploy. Stay tuned !
 Kevin Yu