Containers have become popular thanks to their focus on consistency across platforms from development to production. The rise in interest to containers has in turn brought in higher demands for their deployment and management.
Docker provides a simple solution that is fast to get started with while Kubernetes aims to support higher demands with higher complexity. For many of the same reasons, Docker has been popular among developers who prefer simplicity and fast deployments. At the same time, Kubernetes is used in production environments by many high profile internet companies running popular services.
In the previous post , we have built a Cross-architecture Kubernetes Cluster with VMs and Nvidia Jetson Devices. In this post, we will dig into another useful Cloud Orchestration, namely Docker Swarm to better manage and scale your Cloud Native Application.
Reference:
What is Docker Swarm?

Swarm is the native clustering for Docker. A swarm consists of multiple Docker hosts that run in swarm mode and act as managers (to manage membership and delegation) and workers (which run swarm services). A given Docker host can be a manager, a worker, or perform both roles. When you create a service, you define its optimal state (number of replicas, network, and storage resources available to it, ports the service exposes to the outside world, and more). Docker works to maintain that desired state. For instance, if a worker node becomes unavailable, Docker schedules that node’s tasks on other nodes. A task is a running container that is part of a swarm service and managed by a swarm manager, as opposed to a standalone container.
When Docker is running in swarm mode, you can still run standalone containers on any of the Docker hosts participating in the swarm, as well as swarm services. A key difference between standalone containers and swarm services is that only swarm managers can manage a swarm, while standalone containers can be started on any daemon. Docker daemons can participate in a swarm as managers, workers, or both.
Swarm Architecture

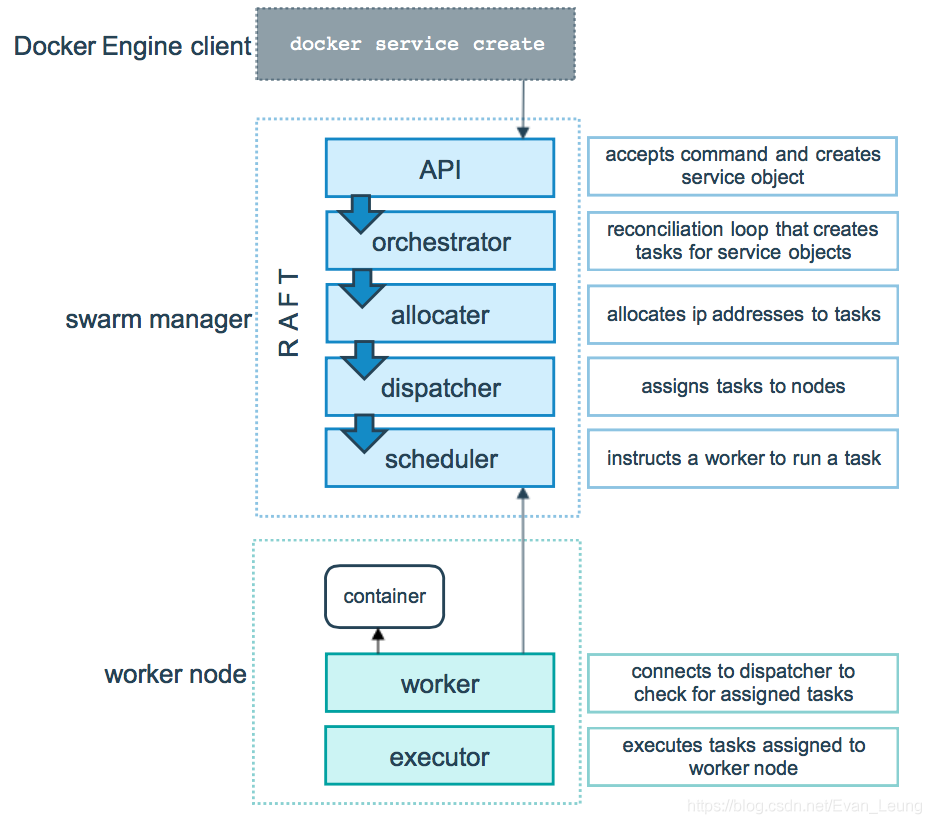
Docker Swarm is a clustering and Orchestration tool for Containers which is inbuilt in Docker Engine for the distributed system which involves hundreds of containers. Docker Nodes, Docker Services, and Docker Tasks are key components of Docker swarm architecture.
Docker Swarm - A swarm is a cluster of Docker Engines or nodes, where we deploy our services.Docker Node - It is the Docker Engine instance included in Docker swarm, has two kinds: Manager Node and Worker NodeWorker nodes - Worker nodes are also instances of Docker Engine whose sole purpose is to execute containers.Manager Node - Responsible for all orchestration and container management tasks required to maintain the system in the desired state such as maintaining the cluster state, scheduling the services, and servicing the swarm mode HTTP endpoints.Docker Service - It is the task definition that needs to be executed.Tasks - A task carries a Docker container and the commands to run inside the container. It is the atomic scheduling unit of a swarm. Manager nodes assign tasks to worker nodes according to the number of replicas set on the service scale. Once a task is assigned to a node, it cannot move to another node.
Swarm Mode
Swarm mode is a Docker feature that provides built-in container orchestration capabilities, including native clustering of Docker hosts and scheduling of container workloads. A group of Docker hosts forms a “swarm” cluster when their Docker engines are running together in “swarm mode.”
Why Docker Swarm?

Docker Swarm is a technique to create and maintain a cluster of Docker Engines. The Docker engines can be hosted on different nodes, and these nodes which are in remote locations form a Cluster when connected in Swarm mode.
Using a Docker Swarm we can achieve High Availability of our web application, Load Balancing, Decentralized Access, and many such benefits.
Services and tasks
When you create a service, you specify which container image to use and which commands to execute inside running containers.
In the replicated services model, the swarm manager distributes a specific number of replica tasks among the nodes based upon the scale you set in the desired state.
For global services, the swarm runs one task for the service on every available node in the cluster.
A task carries a Docker container and the commands to run inside the container. It is the atomic scheduling unit of swarm. Manager nodes assign tasks to worker nodes according to the number of replicas set in the service scale. Once a task is assigned to a node, it cannot move to another node. It can only run on the assigned node or fail.
Load Blancer and Routing Mesh
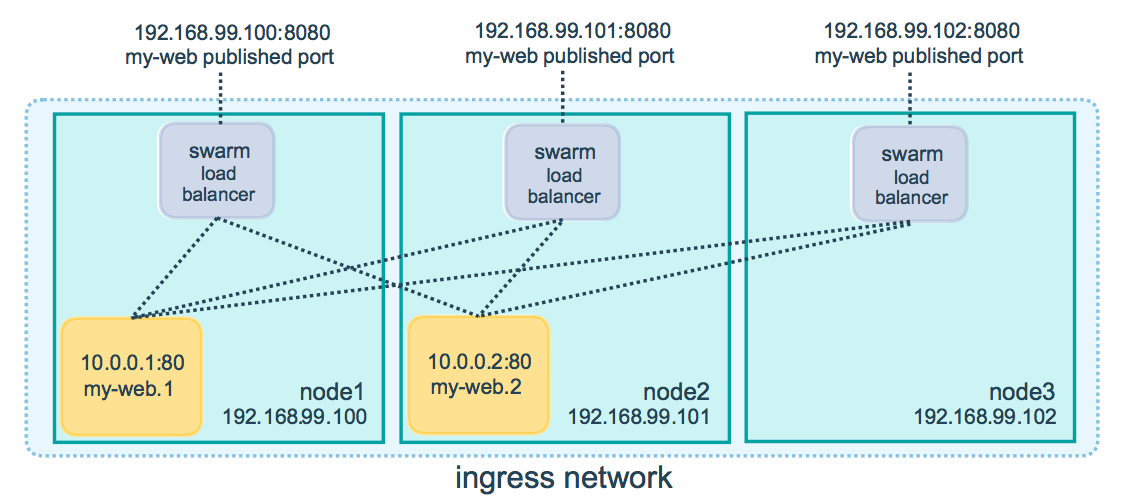
The swarm manager uses ingress load balancing to expose the services you want to make available externally to the swarm. The swarm manager can automatically assign the service a PublishedPort or you can configure a PublishedPort for the service. You can specify any unused port. If you do not specify a port, the swarm manager assigns the service a port in the 30000-32767 range.
External components, such as cloud load balancers, can access the service on the PublishedPort of any node in the cluster whether or not the node is currently running the task for the service. All nodes in the swarm route ingress connections to a running task instance.
Swarm mode has an internal DNS component that automatically assigns each service in the swarm a DNS entry. The swarm manager uses internal load balancing to distribute requests among services within the cluster based upon the DNS name of the service.
Deployment Practice
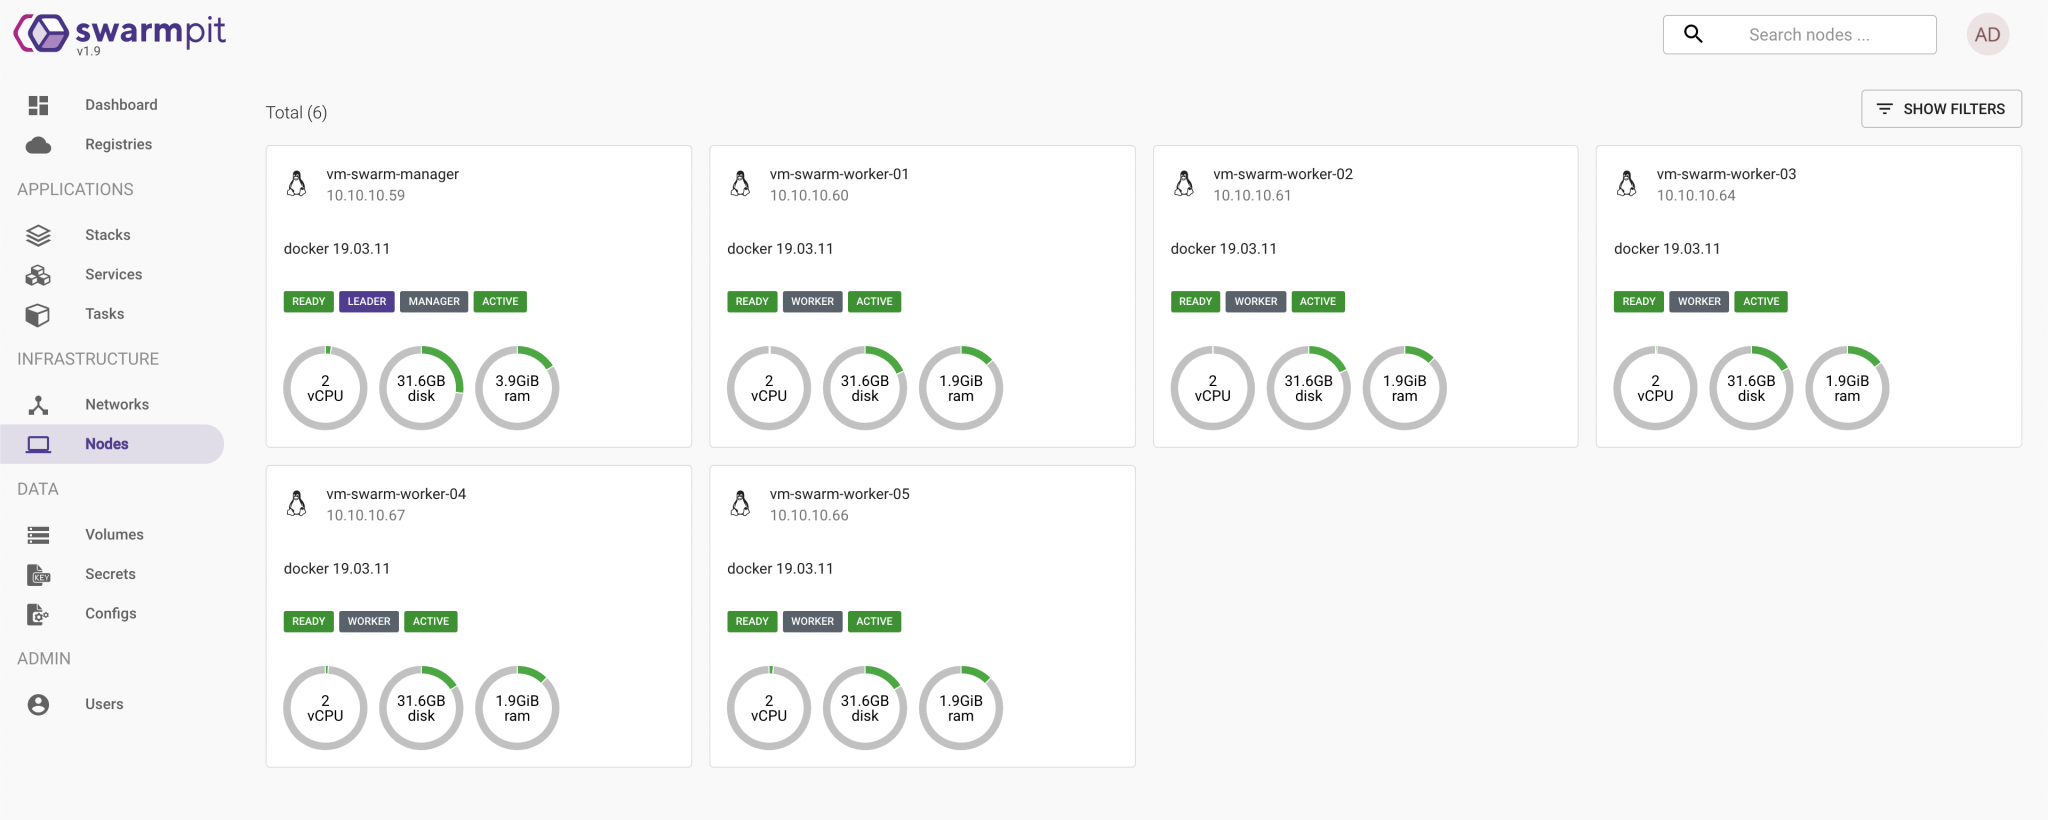
In order to simulate a real practice of Docker Swarm Deployment, I have set up 6 VMs (Virtual Machine) in total, one as the manager for the swarm, and the others as the worker nodes. All the VMs are running Ubuntu 18.04 OS. The chart below demonstrates the flow of how Docker Swarm works in a simple practice.
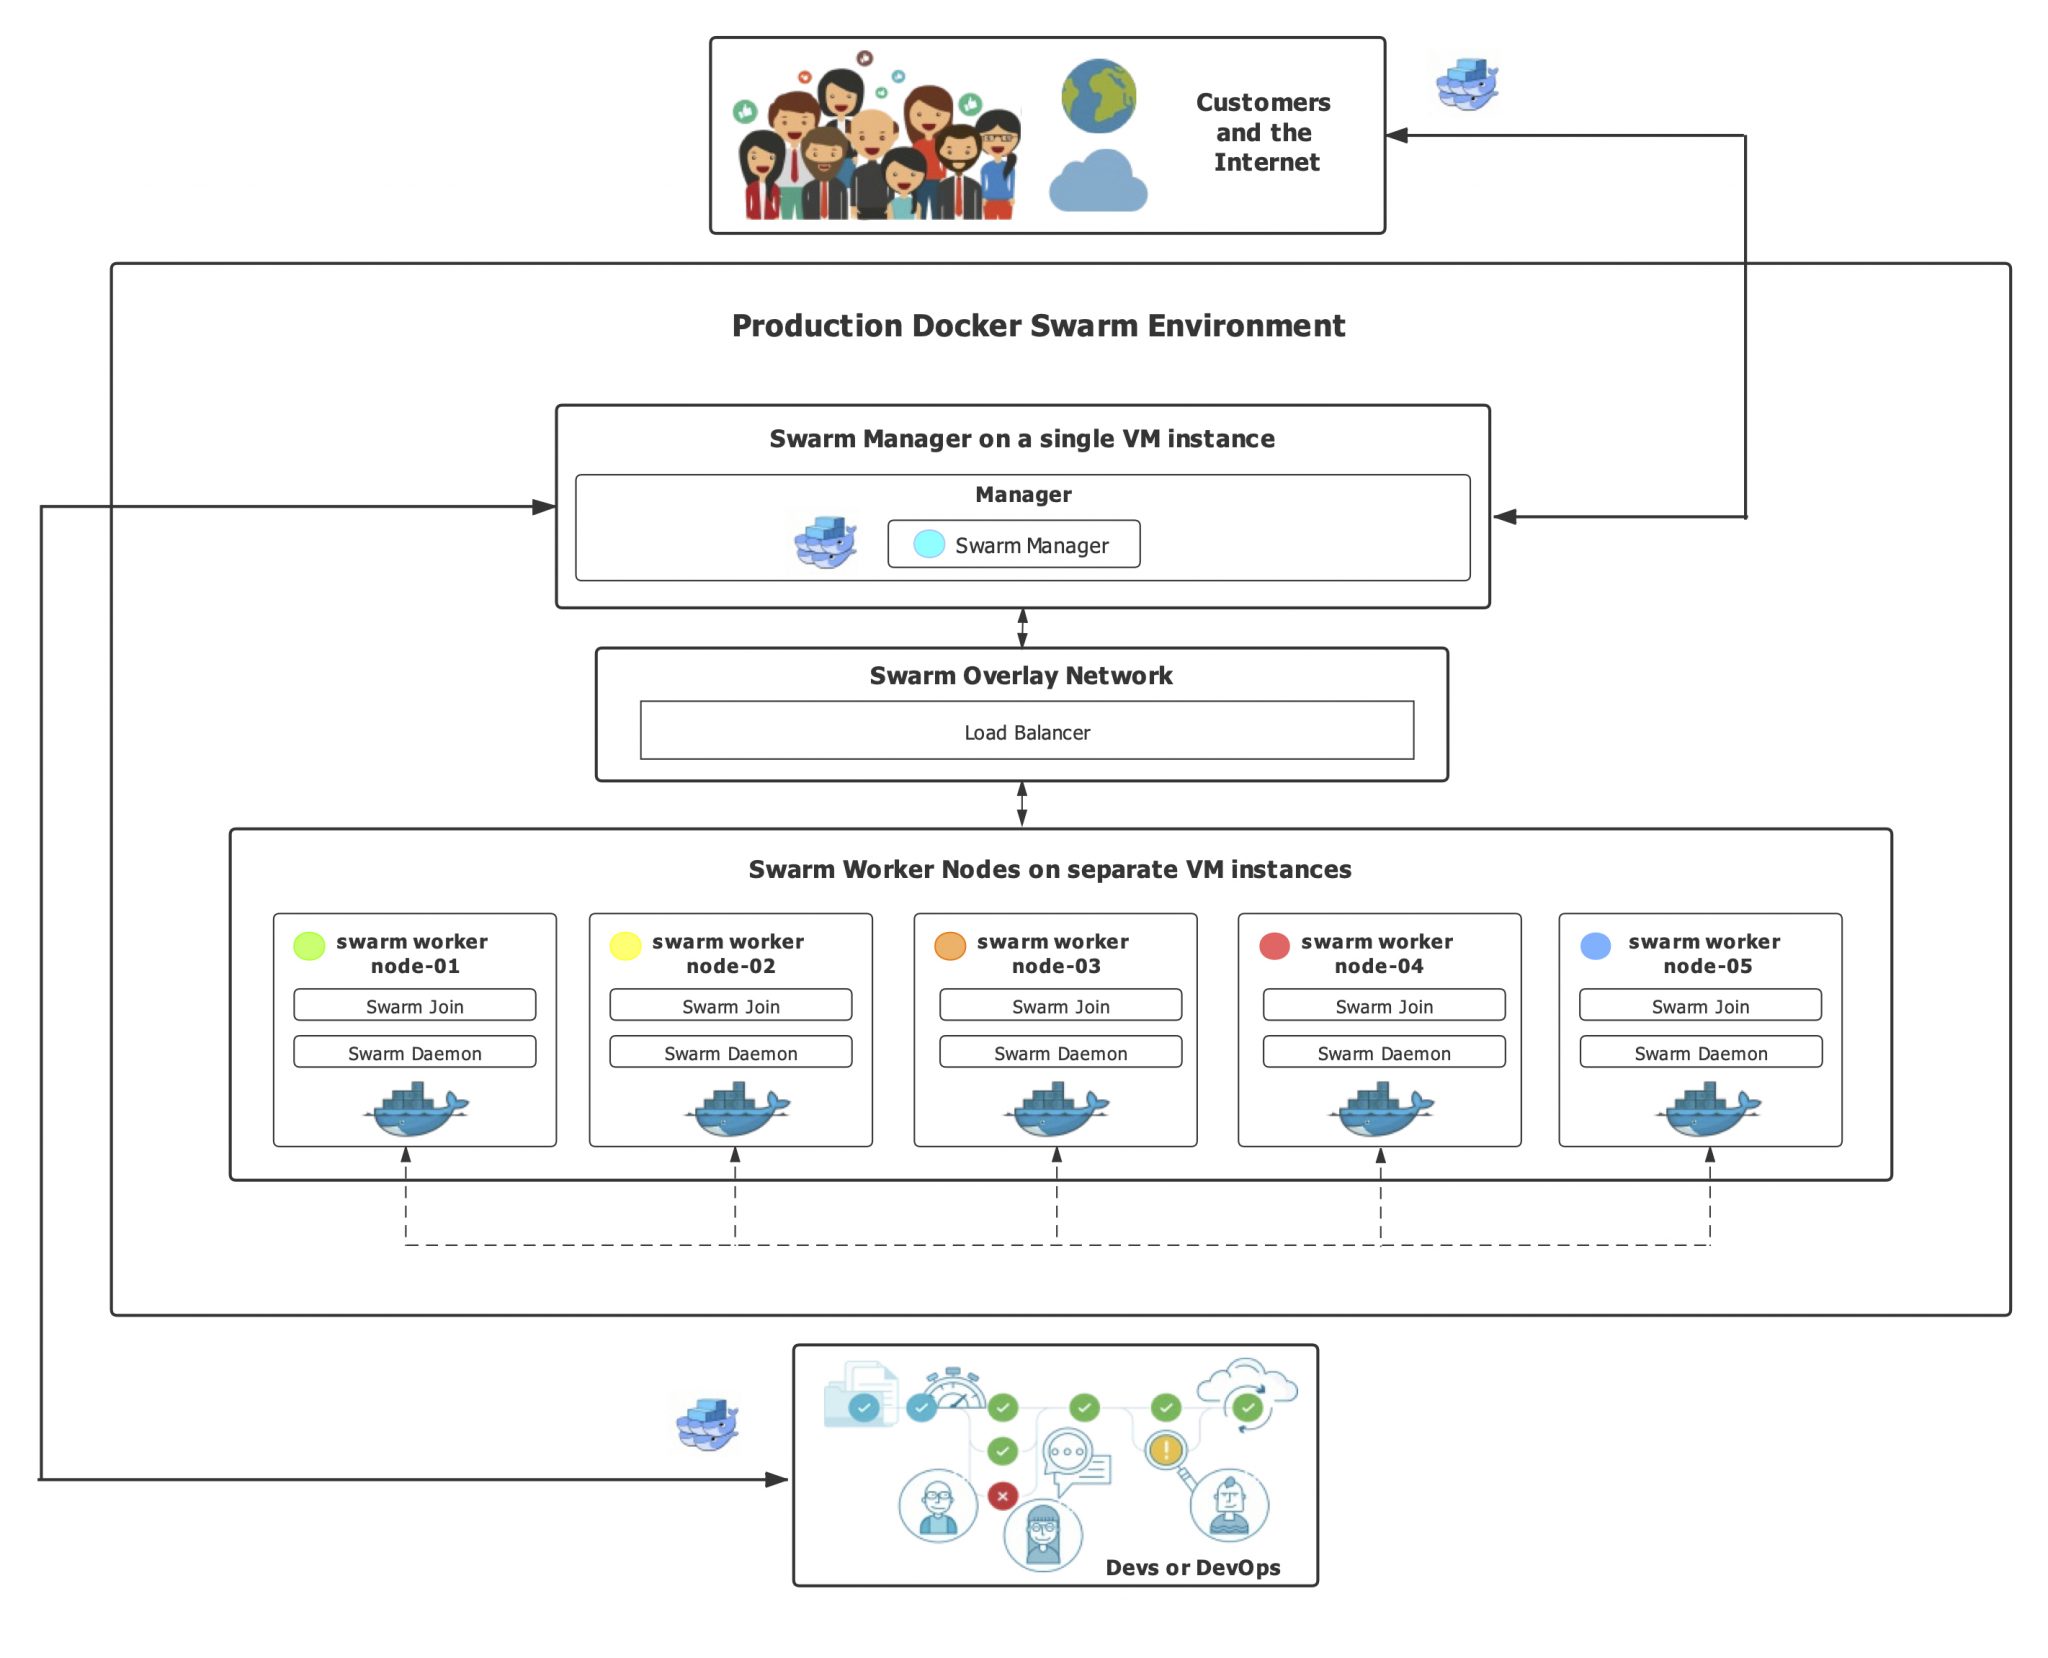
In this deployment practice, six nodes (one manager, and five worker nodes) are running Nginx servers to handle many web requests. The overlay network with Mesh Routing is created by default as the stack of services is deployed. Once a single task (Nginx Container) or a node dies, the swarm scheduler will assign a new task running on the other nodes to balance the workload. In this way, the application can run much more efficiently than what the traditional deployment can offer.
Docker Swam Orchestration Setup
As discussed above, a docker swarm consists of a manager node(s) and many worker nodes. In this example, we will need to initialize a node as a manager, and then join other nodes as workers.
Create a swarm with a manager
Choose a node as the manager node and run the following command:
1$ sudo docker swarm init
Join workers into the swarm
On the other nodes (as workers), Paste the command from the manager node and run it.
1# example:
2$ sudo docker swarm join worker --token SWMTKN-1-5ep4gxxvnh3a61uoxmb2mua5e8p4jk9tbu9o0813js7rt2sbwx-6zdsoe5vyi5qznl9ny76vysay 10.10.10.55:2377
List all on-site nodes
On the manager node, run the following command to check if all the worker nodes have been successfully joined to the swarm cluster
If you have set up correctly, you should be able to see the similar output from the console as follow:
1root@vm-swarm-manager:~# docker node list
2ID                            HOSTNAME             STATUS              AVAILABILITY        MANAGER STATUS      ENGINE VERSION
3of2xd7jrrru3mq7r0ct8cfrzb *   vm-swarm-manager     Ready               Active              Leader              19.03.11
476a2dlgdsih754vc8n3h2beef     vm-swarm-worker-01   Ready               Active                                  19.03.11
575y62h3zxrlbgwc6bpeknvc3s     vm-swarm-worker-02   Ready               Active                                  19.03.11
6aj9h1elke8s8c285ooyjksljz     vm-swarm-worker-03   Ready               Active                                  19.03.11
7w5i6dam4hb21nckygic7kwwp3     vm-swarm-worker-04   Ready               Active                                  19.03.11
8ndvr11i022ybkllsw8gkjbsk7     vm-swarm-worker-05   Ready               Active                                  19.03.11
9root@vm-swarm-manager:~#
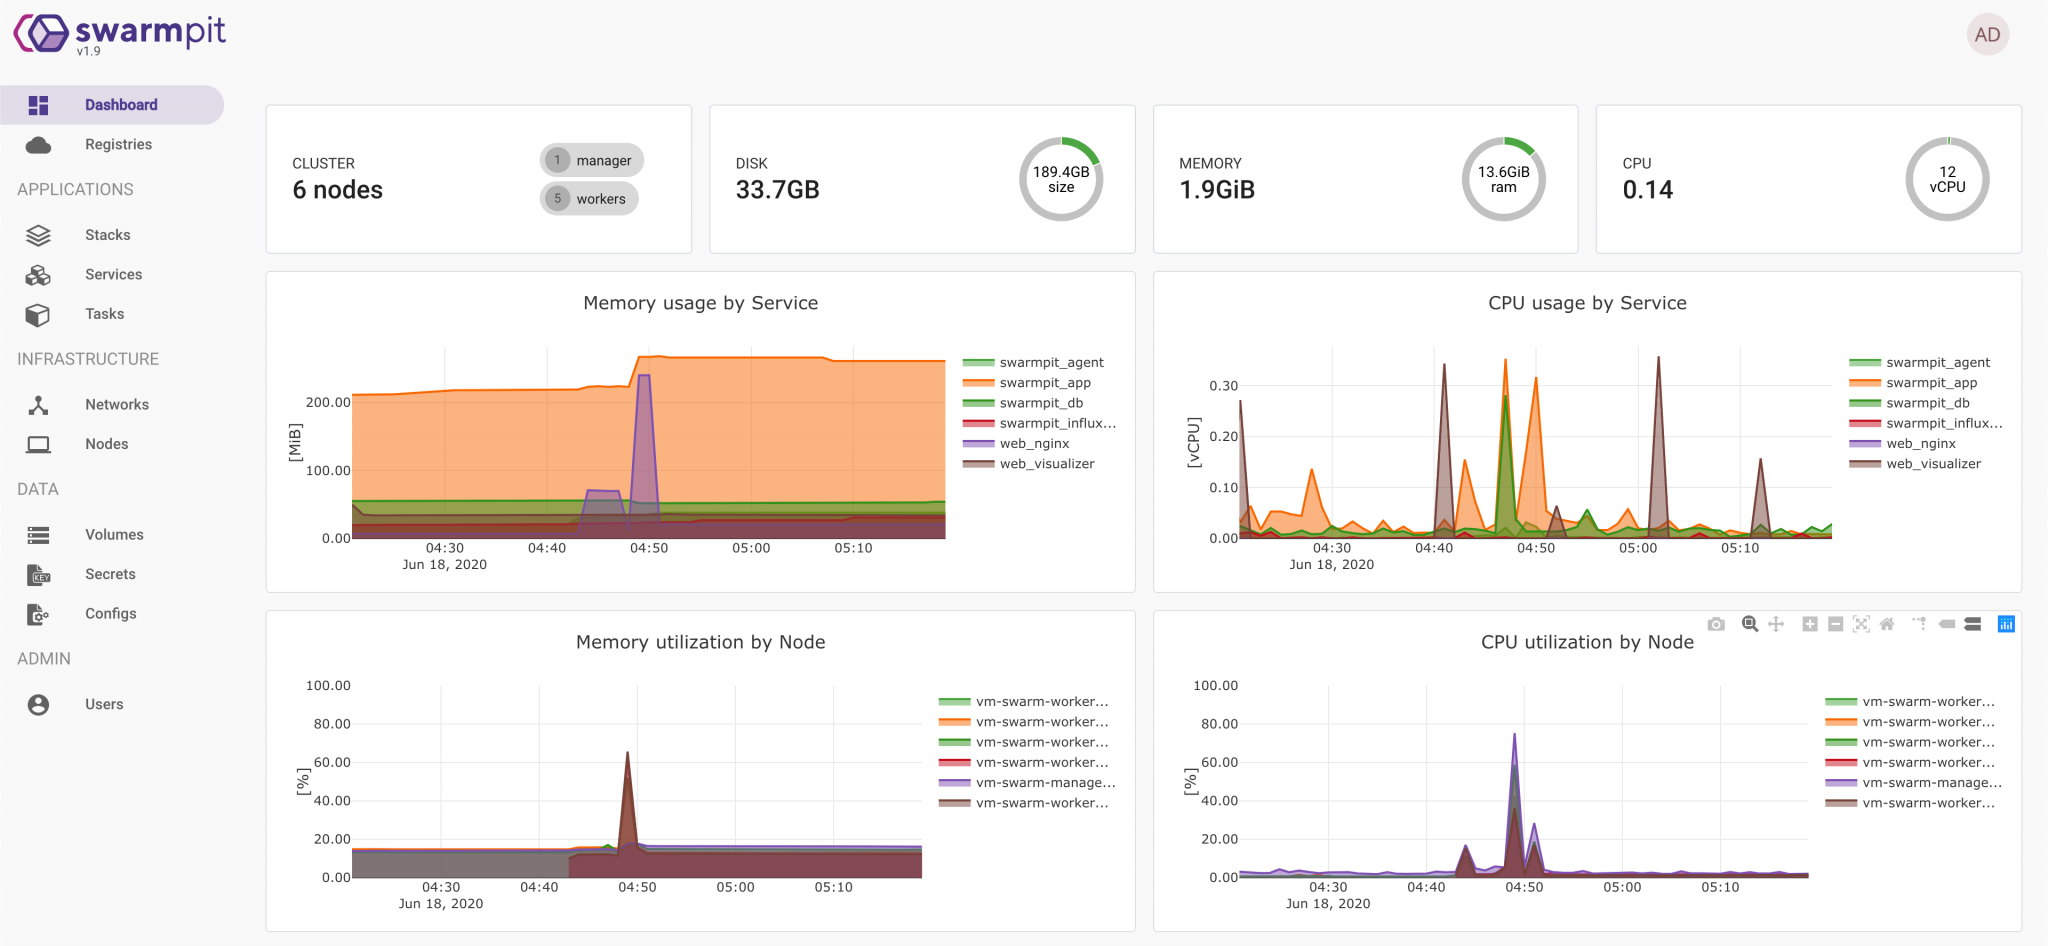
Swarm UI
Swarmpit provides a nice & clean way to manage your Docker Swarm cluster.
Deployment
Install Docker Compose with the following commands:
1$ sudo curl -L "https://github.com/docker/compose/releases/download/1.26.0/docker-compose-$(uname -s)-$(uname -m)" -o /usr/local/bin/docker-compose
2$ sudo chmod +x /usr/local/bin/docker-compose
3$ sudo ln -s /usr/local/bin/docker-compose /usr/bin/docker-compose
4$ docker-compose --version
Install Swarmpit UI by simply running the following command on the Manager Node:
1$ sudo docker run -it --rm \
2    --name swarmpit-installer \
3    --volume /var/run/docker.sock:/var/run/docker.sock \
4    swarmpit/install:1.9
Following the setup instructions on the console, and visit http://ip:888
Create Service
You can choose to create a simple service with CLI, or to create a collection of services (stack) with GUI support. By default, we use the YAML file to deploy multiple micro-services as a stack instance.
CLI (Command Line Interface)
1$ sudo docker service create --replicas 3 -p 3000:80 --name nginx-server nginx
2$ sudo docker service ls
3$ sudo docker service ps nginx-server
“nginx-server” is the name of the service; nginx is the name of the docker image
GUI (Graphical User Interface)
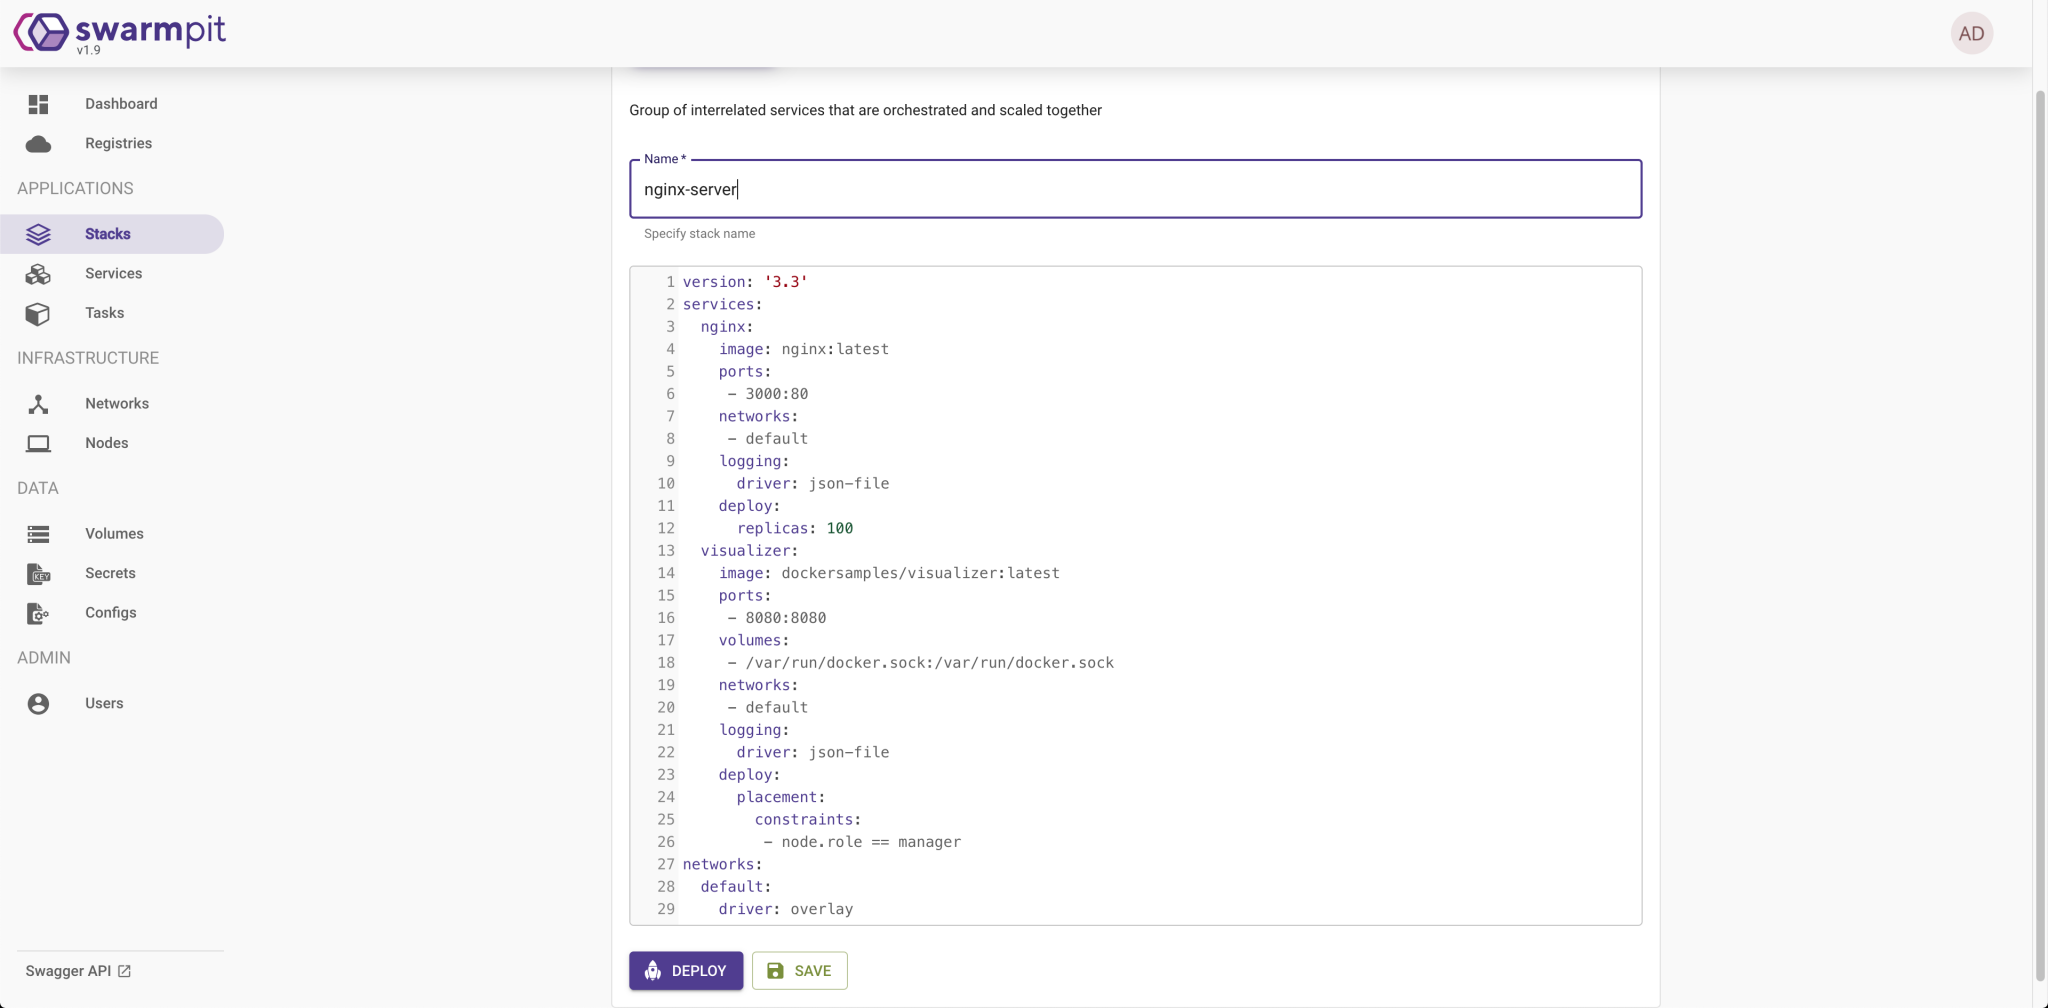
Click the Stacks tab on the left panel, and fill in the name of the stack instance, fill in the content of the YAML file, and hit Deploy:
 1version: "3.3"
 2services:
 3  nginx:
 4    image: nginx:latest
 5    ports:
 6      - 3000:80
 7    networks:
 8      - default
 9    logging:
10      driver: json-file
11    deploy:
12      replicas: 100
13  visualizer:
14    image: dockersamples/visualizer:latest
15    ports:
16      - 8080:8080
17    volumes:
18      - /var/run/docker.sock:/var/run/docker.sock
19    networks:
20      - default
21    logging:
22      driver: json-file
23    deploy:
24      placement:
25        constraints:
26          - node.role == manager
27networks:
28  default:
29    driver: overlay
You should be able to visit the nginx server default page at http://localhost:3000
You may also visit the Docker Visualizer tailored to monitoring the status of Swarm at http://localhost:8080
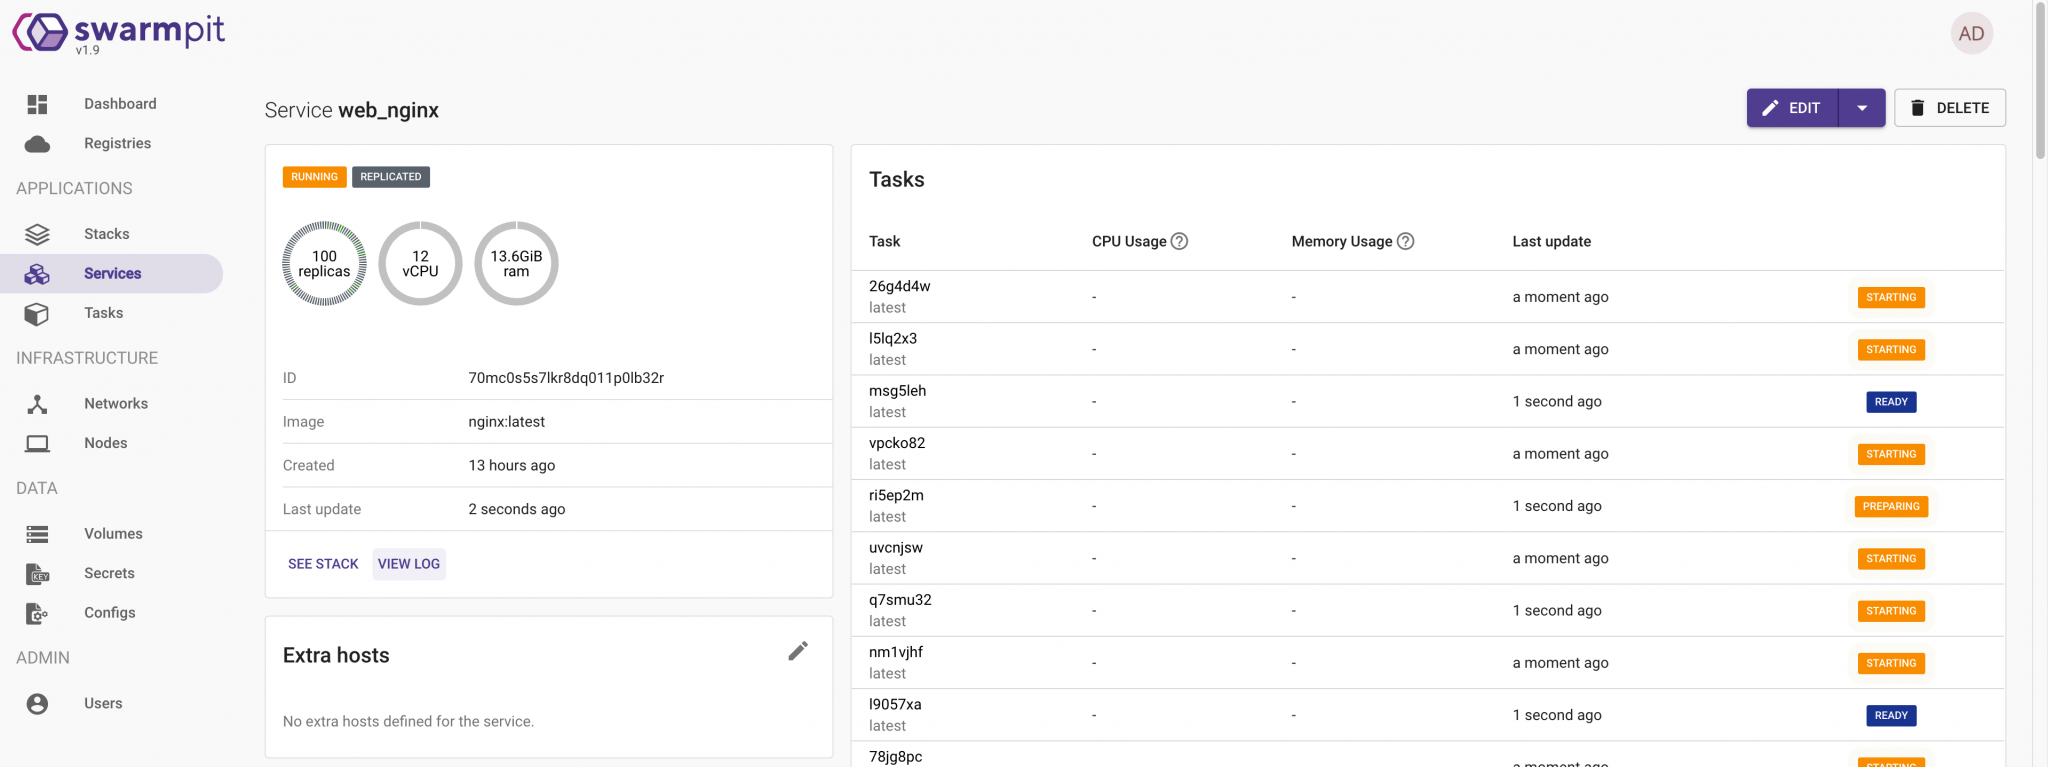
Check Service Status
You may find the service status on the Service tab.
Service Scaling
You can easily scale up or down the number of tasks (Nginx Containers) created by a service with the GUI support. To do so, simply hit the “Edit” button on the upper right corner of the panel.
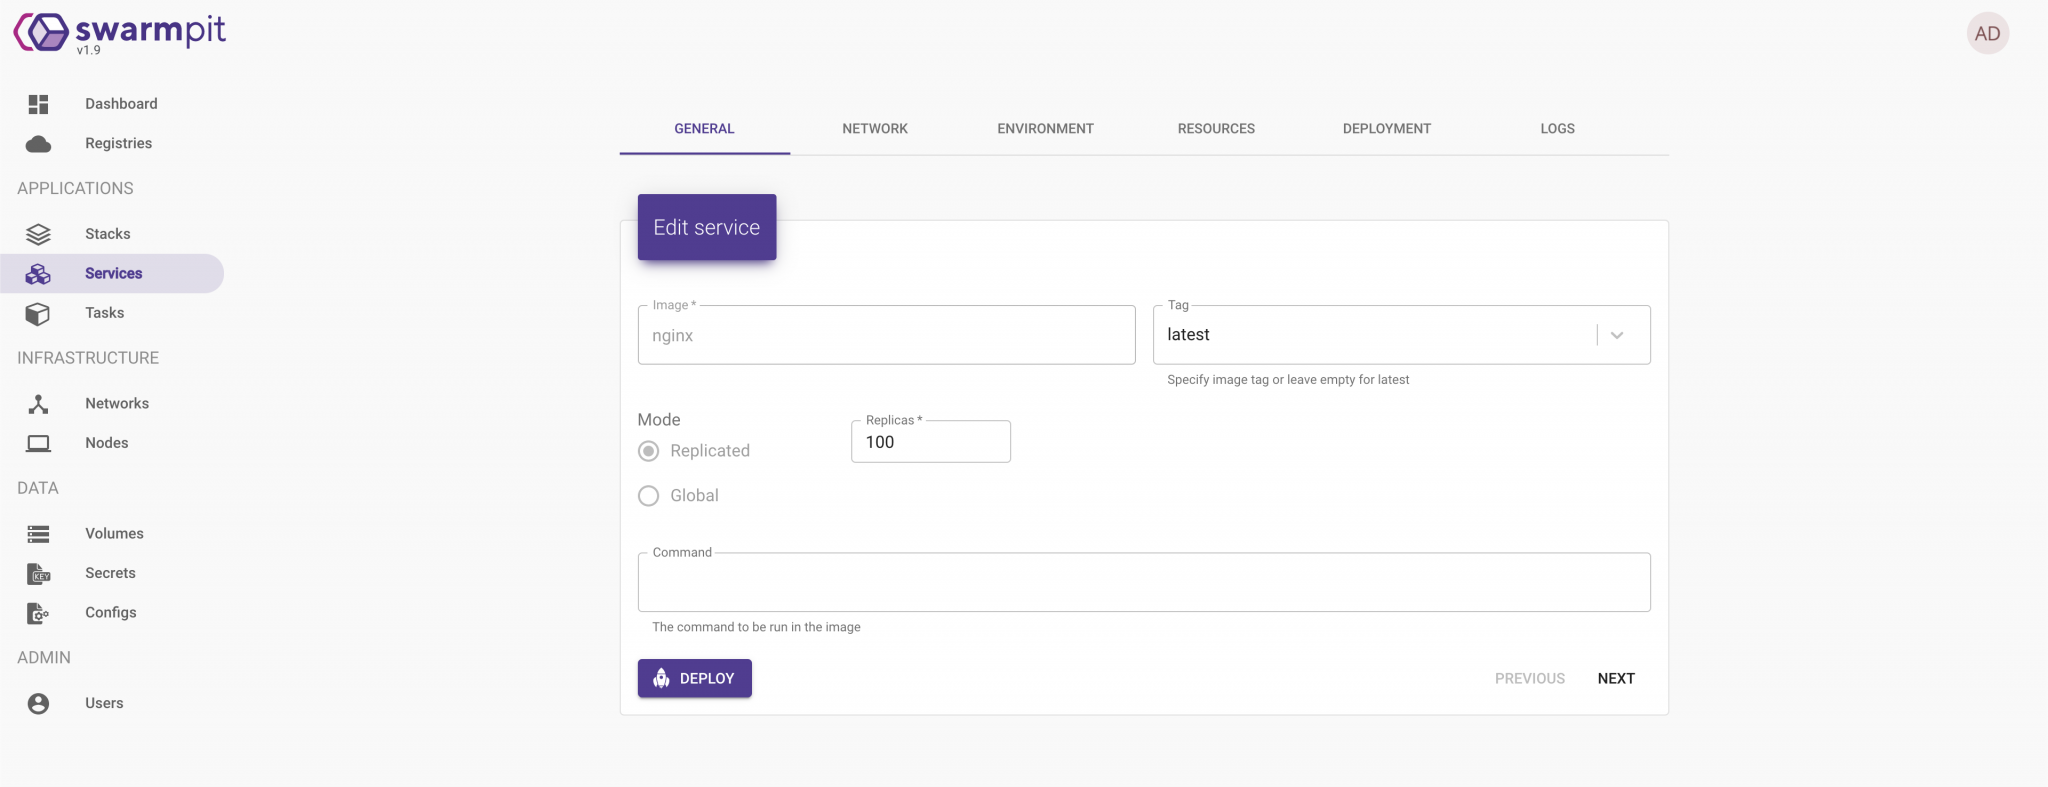
As for a demonstration, I scaled up the Nginx tasks to “100”. The tasks will be evenly distributed to all the available nodes. You may also check the health status for each task.
Thoughts
Docker Swarm has the advantage of tightly integrated into the Docker ecosystem, and uses its own API. Its filtering and scheduling system enables the selection of optimal nodes in a cluster to deploy containers.
As it is developed by Docker itself, Docker Swarm removes many compatibility and other differences and integrates smoothly. Kubernetes usually is not a complete solution and requires custom plug-ins to set up. If you use Docker Swarm, all these dependencies are handled well within the ecosystem, making installation and setup really smooth.
However, Docker Swarm is not extensively used as Kubernetes. Hence, the community and support around it are not as expansive and convenient to reach out to.

 Kevin Yu