Recently, I found a very useful library that can utilize TensorRT to massively accelerate DNN (Deep Neural Network) application — the Jetson-Inference Library developed by Nvidia.
The Jetson-Inference repo uses NVIDIA TensorRT for efficiently deploying neural networks onto the embedded Jetson platform, improving performance and power efficiency using graph optimizations, kernel fusion, and FP16/INT8 precision. Vision primitives, such as ImageNet for image recognition, DetectNet for object localization, and SegNet for semantic segmentation, inherit from the shared TensorNet object. Examples are provided for streaming from live camera feed and processing images. See the API Reference section for detailed reference documentation of the C++ and Python libraries.
In this post, we will build an Object Detection API with DetectNet and OpenCV. OpenCV has many built-in functions that allow us to build versatile applications. Moreover, you may easily change input video sources as well.
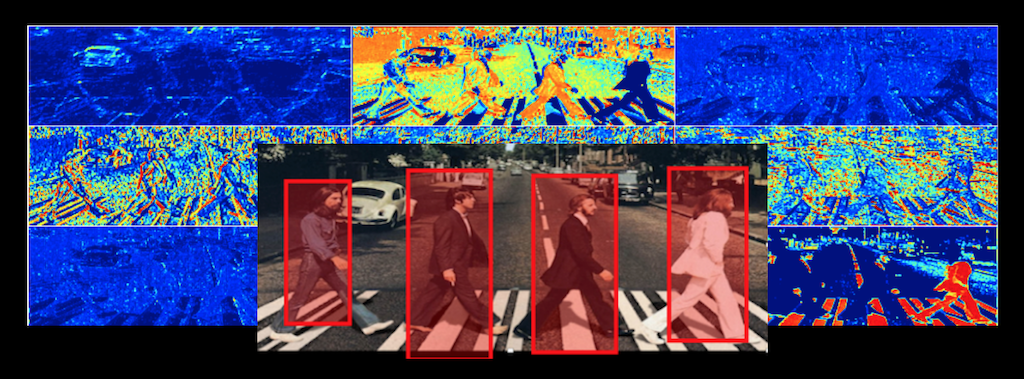
Demo
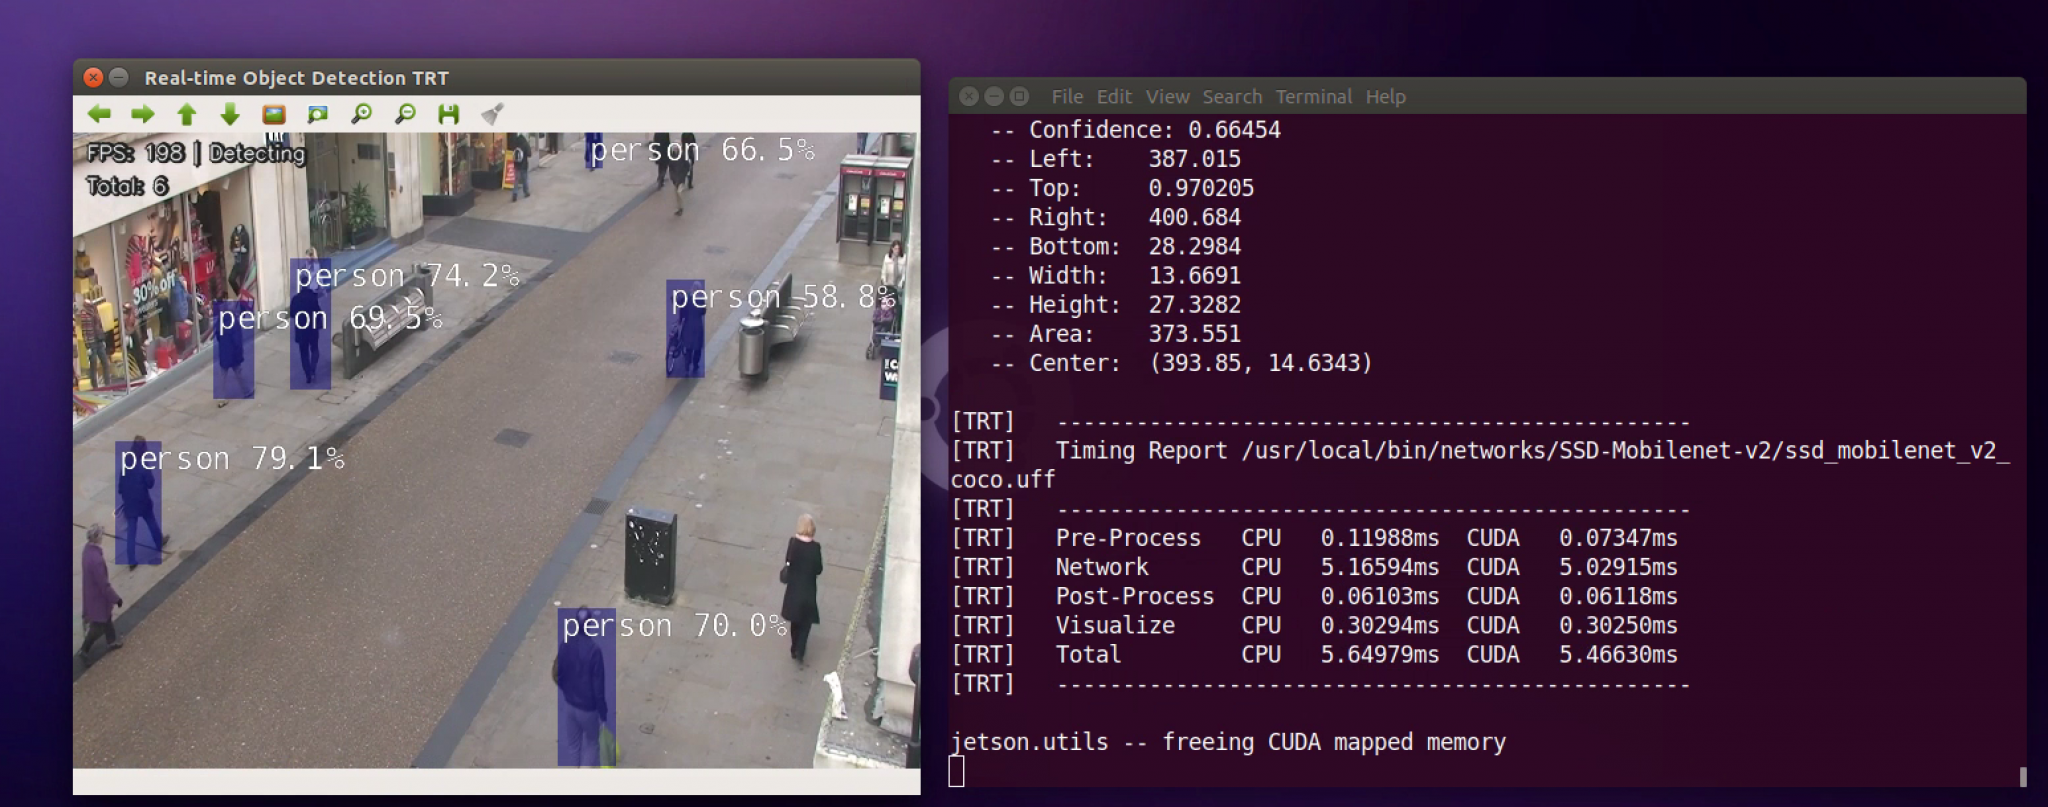
SSD Mobilenet V2
The demo is running @ 200-225 FPS on my Jetson AGX Xavier DevKit.

Pednet
The demo is running @ 90-100 FPS on my Jetson AGX Xavier DevKit.
Prerequisite
Quick Installation
This demo requires jetson-inference prebuilt in your Jetson Device. To do so, you may visit the repo provided by Nvidia, or you may type in the following commands in the console.
 1$ sudo apt-get update
 2$ sudo apt-get install git cmake libpython3-dev python3-numpy
 3$ git clone --recursive https://github.com/dusty-nv/jetson-inference
 4$ cd jetson-inference
 5$ mkdir build
 6$ cd build
 7$ cmake ../
 8$ make -j$(nproc)
 9$ sudo make install
10$ sudo ldconfig
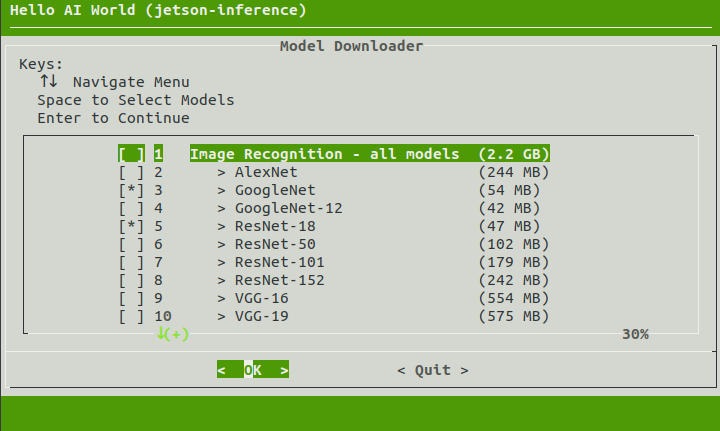
If you have executed all the commands above with no error, you should be good to go. Notes: in the process, there will be windows named Model Downloader, and Pytorch Installer popped up, please carefully check out the descriptions in the sections below.
Download Models
The jetson-inference project comes with many pre-trained networks that can you can choose to have downloaded and installed through the Model Downloader tool (download-models.sh). By default, not all of the models are initially selected for download to save disk space. You can select the models you want, or run the tool again later to download more models another time.
When initially configuring the project, cmake will automatically run the downloader tool for you:
To run the Model Downloader tool again later, you can use the following commands:
1# Executes the commands below ONLY IF you have successfully compiled the jetson-inference library
2$ cd jetson-inference/tools
3$ ./download-models.sh
Install PyTorch
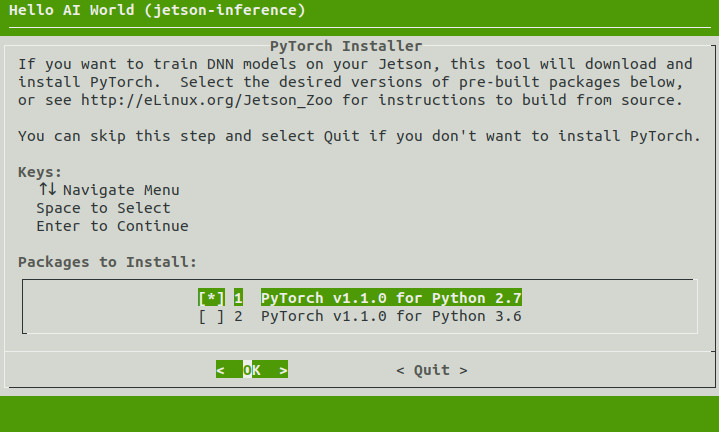
If you are using JetPack 4.2 or newer, another tool will now run that can optionally install PyTorch on your Jetson if you want to re-train networks with transfer learning later in the tutorial. This step is optional, and if you don’t wish to do the transfer learning steps, you don’t need to install PyTorch and can skip this step.
If desired, select the PyTorch package versions for Python 2.7 and/or Python 3.6 that you want to be installed and hit Enter to continue. Otherwise, leave the options un-selected, and it will skip the installation of PyTorch.
Quick Start
Once you have set up the jetson-inference library, you may simply copy the Python script below and run it on your local device.
 1#!/usr/bin/python3
 2import numpy as np
 3import cv2
 4import jetson.inference
 5import jetson.utils
 6
 7# setup the network we are using
 8net = jetson.inference.detectNet("ssd-mobilenet-v2", threshold=0.5)
 9cap = cv2.VideoCapture(0)
10# cap = cv2.VideoCapture('video.mp4')
11cap.set(3,640)
12cap.set(4,480)
13
14while (True):
15    ret, frame = cap.read()
16    frame = cv2.resize(frame, (640, 480))
17    w = frame.shape[1]
18    h = frame.shape[0]
19    # to RGBA
20    # to float 32
21    input_image = cv2.cvtColor(frame, cv2.COLOR_RGB2RGBA).astype(np.float32)
22    # move the image to CUDA:
23    input_image = jetson.utils.cudaFromNumpy(input_image)
24
25    detections = net.Detect(input_image, w, h)
26    count = len(detections)
27    print("detected {:d} objects in image".format(len(detections)))
28    for detection in detections:
29        print(detection)
30
31    # print out timing info
32    net.PrintProfilerTimes()
33    # Display the resulting frame
34    numpyImg = jetson.utils.cudaToNumpy(input_image, w, h, 4)
35    # now back to unit8
36    result = numpyImg.astype(np.uint8)
37    # Display fps
38    fps = 1000.0 / net.GetNetworkTime()
39    font = cv2.FONT_HERSHEY_SIMPLEX
40    line = cv2.LINE_AA
41    cv2.putText(result, "FPS: " + str(int(fps)) + ' | Detecting', (11, 20), font, 0.5, (32, 32, 32), 4, line)
42    cv2.putText(result, "FPS: " + str(int(fps)) + ' | Detecting', (10, 20), font, 0.5, (240, 240, 240), 1, line)
43    cv2.putText(result, "Total: " + str(count), (11, 45), font, 0.5, (32, 32, 32), 4, line)
44    cv2.putText(result, "Total: " + str(count), (10, 45), font, 0.5, (240, 240, 240), 1, line)
45    # show frames
46    cv2.imshow('frame', result)
47    if cv2.waitKey(1) & 0xFF == ord('q'):
48        break
49
50# When everything done, release the capture
51cap.release()
52cv2.destroyAllWindows()
Execute the script:
1$ nano demo.py
2# Copy and paste the content above
3$ sudo chmod +x demo.py
4$ ./demo.py
By default, the program will open a V4L2 (WebCam) and import frames as stream input. You may modify the line “cap = cv2.VideoCapture(‘video.mp4’)” to pass a custom video file as input source.
Conclusion
Jetson-Inference guide to deploying deep-learning inference networks and deep vision primitives with TensorRT and NVIDIA Jetson. With such a powerful library to load different Neural Networks, and with OpenCV to load different input sources, you may easily create a custom Object Detection API, like the one shown in the demo.
The reason why this Object Detection API is faster than most of the frameworks is that it utilized TensorRT to accelerate the data processing, hence effectively enhancing the detection efficiency.
 Kevin Yu