In the previous post, we have covered the basic concepts of MQTT such as Client/Broker, Subscription/Publish, and MQTT’s Workflow. In this post, we are going to dig into the MQTT workflow and create a communication channel between devices. Basically, any devices ranging from Desktop, Laptop, to Edge devices can serve as a broker, a client, or both simultaneously.
I strongly recommend going through all the topics in my previous POST before starting this tutorial. Otherwise, you might encounter lots of troubles.
Quick Link: https://github.com/miooochi/MQTT
Workflow Review
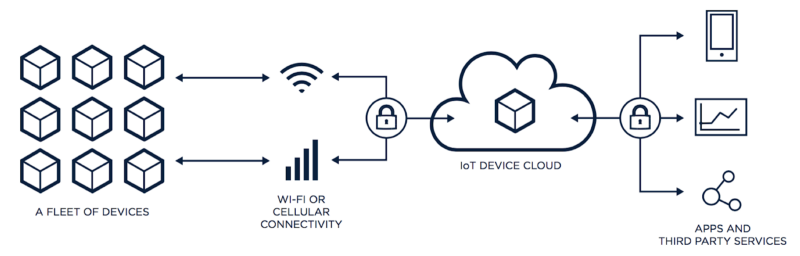
The MQTT protocol defines two types of entities in the network: a message broker and a number of clients.
-
* The client connects to the broker. It can subscribe to any message “topic” in the broker. This connection can be a plain TCP/IP connection or an encrypted TLS connection for sensitive messages.
-
* The client publishes messages under a topic by sending the message and topic to the broker.
-
* The broker then forwards the message to all clients that subscribe to that topic.
Since MQTT messages are organized by topics, the application developer has the flexibility to specify that certain clients can only interact with certain messages. For example, sensors will publish their readings under the “sensor_data” topic and subscribe to the “config_change” topic. Data processing applications that save sensor data into a backend database will subscribe to the “sensor_data” topic. An admin console application could receive system admin’s commands to adjust the sensors’ configurations, such as sensitivity and sample frequency, and publish those changes to the “config_change” topic.
At the same time, MQTT is lightweight. It has a simple header to specify the message type, a text-based topic, and then an arbitrary binary payload. The application can use any data format for the payload, such as JSON, XML, encrypted binary, or Base64, as long as the destination clients can parse the payload.
Quick Demo
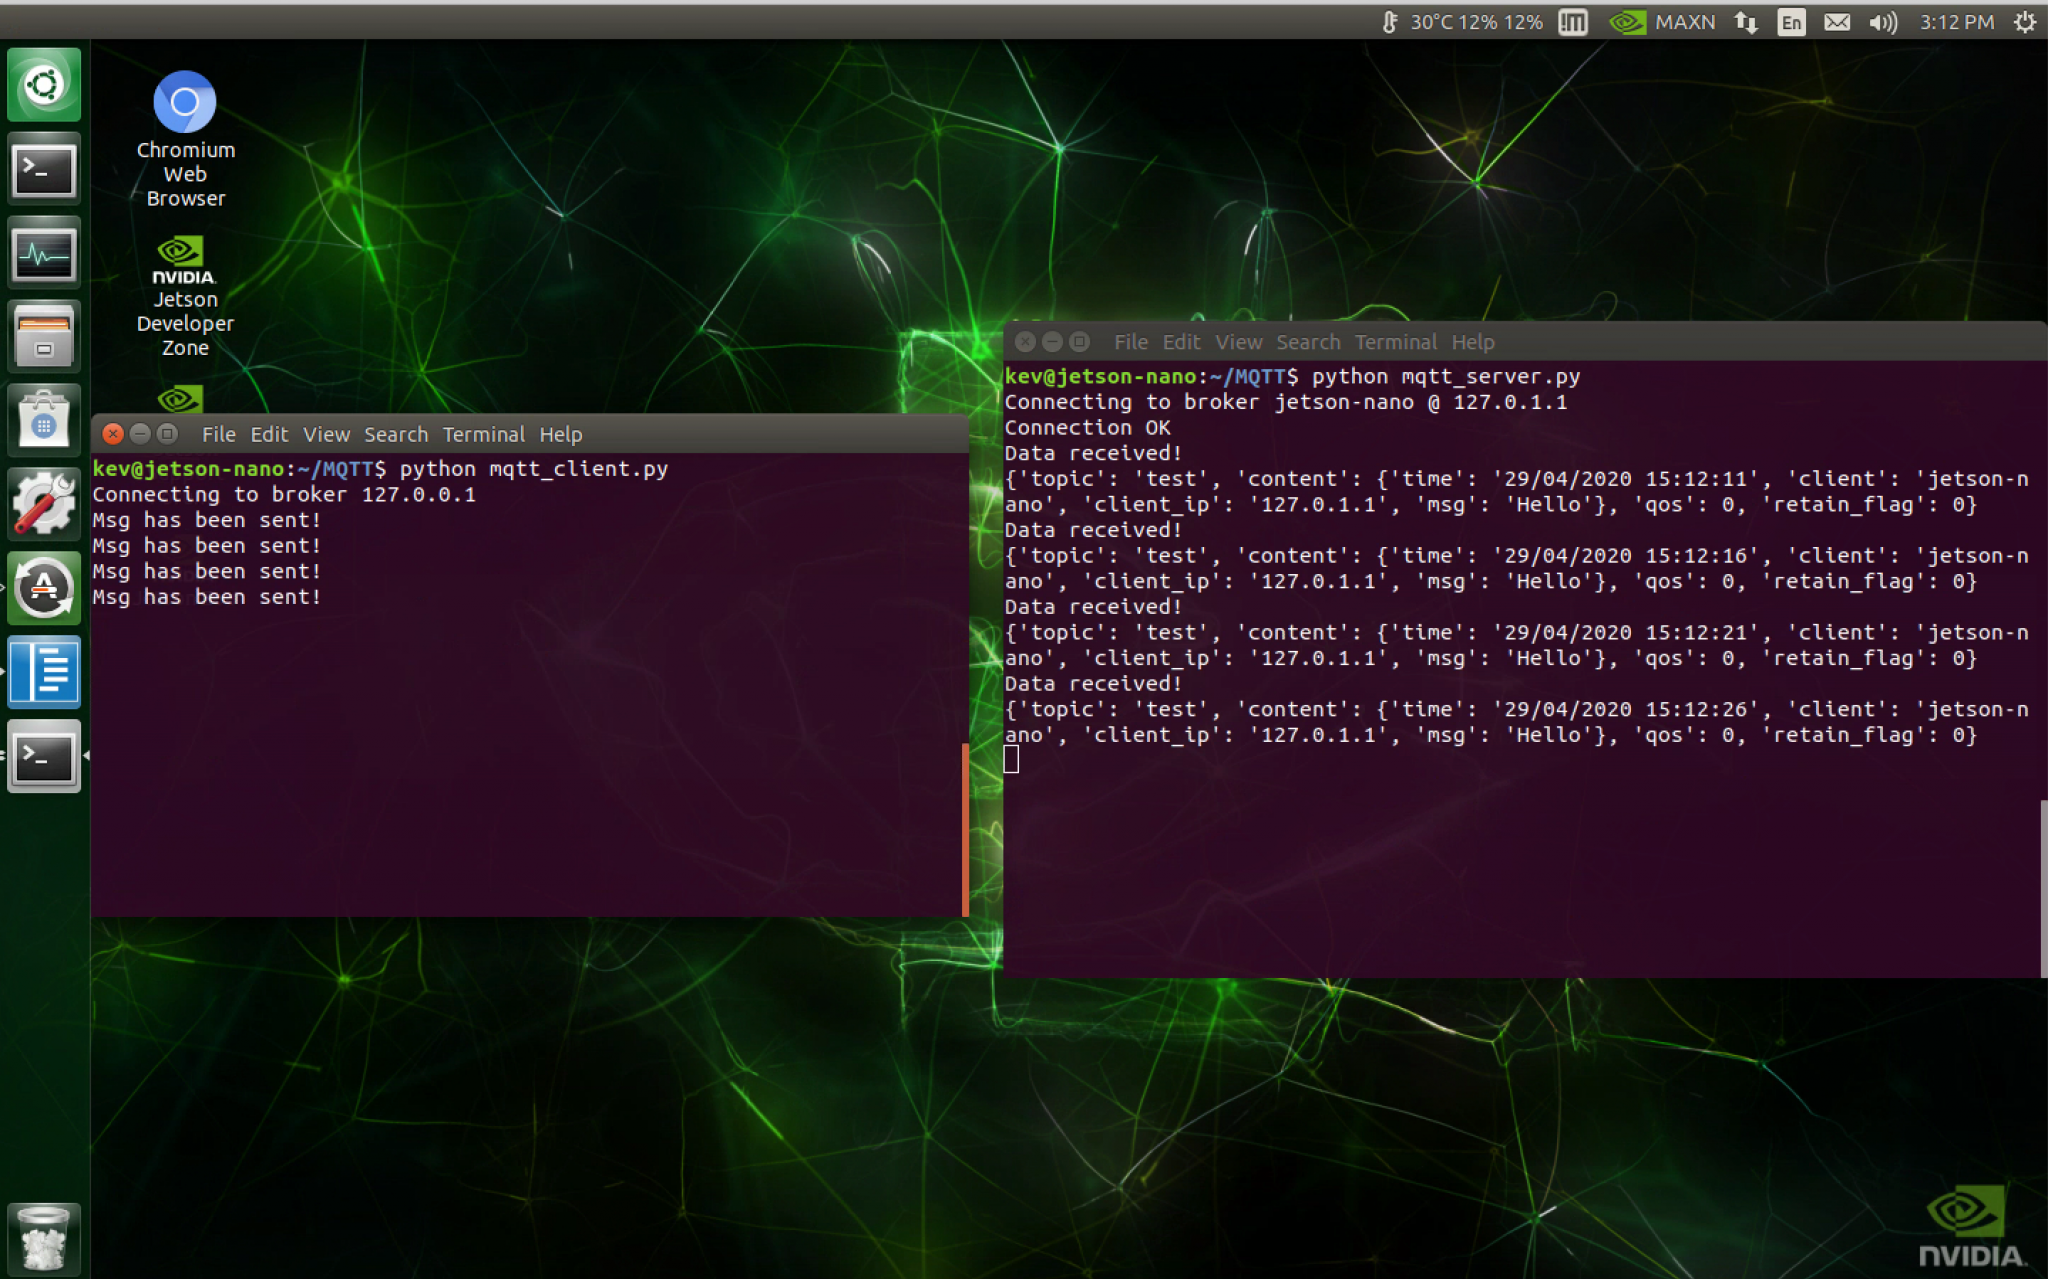
Send JSON data to a single device (Jetson Nano)
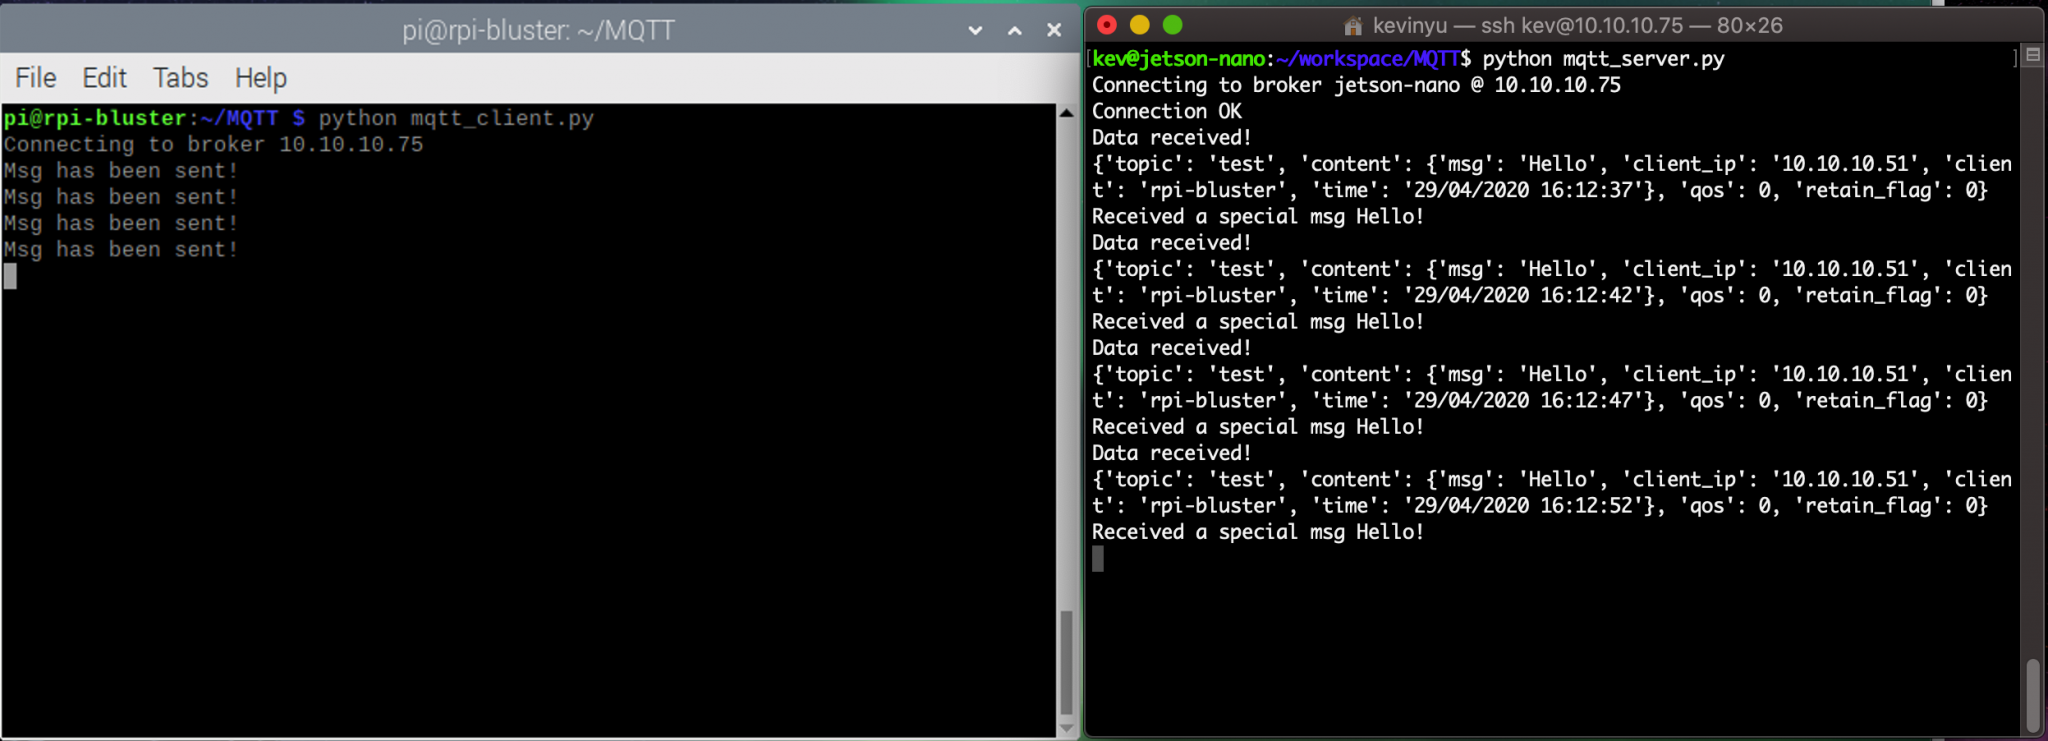
Send JSON data between devices (Raspberry Pi & Jetson Nano)

JSON data details
You can customize the JSON data format and content based on your own need. However, you will need to specify the IP Address of the broker, or the data will not be successfully sent with MQTT Protocol.
Setup
Install Guide
In this demo, we will be using Python scripts to host an MQTT server to receive messages, and also to server as a client to send messages. The install lation is quite simple. Run the Shell Command in your terminal, and make sure you are using Python 3.
Clone the Repo
1$ cd ~
2$ git clone https://github.com/miooochi/MQTT
3$ cd MQTT
Repo Tree
mqtt-server.py –> setup your local machine as a broker (your local machine can both server as a broker and a client)
mqtt-client.py –> setup your local machine as a client (your local machine can both server as a broker and a client)
utils.py –> defines all the functions needed for the communication
Configuration
Broker
You do not need to specify the IP Address of your local device as a broker, the script will take care of the IP for you. The Python script for hosting a broker is shown as below
 1# MQTT Client demo
 2# Creator: Kevin Yu
 3
 4import paho.mqtt.client as mqtt
 5import time
 6import json
 7from utils import on_log, on_connect, on_disconnect, on_message, get_ip
 8
 9# Create an MQTT brocker
10broker=get_ip()[1]
11
12# Create an MQTT client and attach our routines to it.
13client=mqtt.Client() #new instance
14# Bind call back function
15client.on_connect=on_connect
16client.on_disconnect=on_disconnect
17client.on_message=on_message
18# Enable log
19#client.on_log=on_log
20
21# Connect to broker
22print("Connecting to broker {} @ {} ".format(get_ip()[0],broker))
23client.connect(broker,1883,60)
24client.loop_forever()
Client
Open up mqtt-client.py Modify the IP Address of the broker as shown below:
1import paho.mqtt.client as mqtt
2import time
3import json
4from datetime import datetime
5from utils import on_log, on_connect, on_disconnect, on_message, get_ip
6
7# Create an MQTT client and attach our routines to it.
8# Modify the Broker IP Address below
9broker="127.0.0.1" # <-- change IP here
Config Cusom Json Data
If you want to config your own JSON data, you may navigate to line #20 of the script below, and change the content of the JSON data based on your own need. However, I recommend keeping the client and client_ip objects since they are useful for the broker to identify the source of the message.
 1client=mqtt.Client() #new instance
 2# Bind call back function
 3client.on_connect=on_connect
 4client.on_disconnect=on_disconnect
 5client.on_message=on_message
 6
 7# Enable log
 8#client.on_log=on_log
 9
10# Connect to broker
11print("Connecting to broker {}".format(broker))
12client.connect(broker,1883,60)
13
14# Publish a message
15# It is set to send the message every 5 seconds by default
16while True:
17    # Create a msg object
18# - - - - - - - - - - - - - - - - - - - - - - - - - - - - - #
19# Config your own JSON data below
20    data={
21        "time":datetime.now().strftime("%d/%m/%Y %H:%M:%S"),
22        "client":get_ip()[0],
23        "client_ip":get_ip()[1],
24        "msg":"Hello"
25    }
26
27    # Encode message to Json String
28    data_out=json.dumps(data)
29    client.publish("test",data_out)
30    print("Msg has been sent!")
31    time.sleep(5)  # <-- Change time interval here
32
33client.disconnect() # Disconnect
Notes:
* The mqtt_client program is set to send messages every five seconds, you may also set a specific time interval based on your own need. This feature allows you to send data such as sensors data constantly to the broker so that the broker can keep track of the system status of the client device.* You may also disconnect the client once it finishes sending a message for a one-time message send usage.* For debug purpose, you may enable the log features by commenting out “client.on_log=on_log”
IOT Advanced Integration
All the functions associated with this demo can be found in the “utils.py” in the repo. Please check out the detailed descriptions below.
Connection Call-back Function
1def on_connect(client, userdata, flags, rc):
2    if rc==0:
3    # Subscribing in on_connect() - if we lose the connection and
4        # reconnect then subscriptions will be renewed.
5        client.subscribe("test") # <-- change the topic here
6        print("Connection OK")
7    else:
8        print("Bad connection returned code=",rc)
This function is mainly for two purposes:
* To track if a client successfully connects to the broker.* To enable subscription to a specific topic once the client connects to the broker. *Notes: the message can only be interchanged if the broker and the client subscribe to the same topic. You may add more topics based on your own needs.
Message Call-back Function
 1def on_message(client, userdata, message):
 2    print("Data received!")
 3    # Decode message from Json to Python Dictionary
 4    content=json.loads(message.payload.decode("utf-8","ignore"))
 5    msg=content['msg']
 6    data={
 7    "topic":message.topic,
 8    "content":content,
 9    "qos":message.qos,
10    "retain_flag":message.retain
11    }
12    print(data)
13    if msg == u'Hello': #Unicode String
14        print("Received a special msg {}!".format(content['msg']))
15        # Do something #  <-- Integrate more IoT Functions here
This function is mainly for three purposes:
* To confirm the topic, message content, client_name, and client_ip associated with that received message.* To decode the JSON data associated with the message sent from the client. Notes: the format of the received data is in Unicode String format, you may look up [here] if you want to convert the Unicode String to a Plain String.* To enable and integrates more IoT Functionalities such as turning ON/OFF a servo when receiving a specific message (‘ON’) from client, you may just insert your Servo code below #Do Something
Wrap Up
In this post, we have walked through a practical example of how to communicate between devices (Edge devices) with MQTT protocol. This demo may also apply to a more advanced scenario, for instance, streaming data to the Public Cloud platform such as Google Cloud IoT Core and Azure IoT Hub. If you want to study more about MQTT, you may visit the site here. I hope you could find something useful for your project development. Enjoy!
 Kevin Yu