IoT (Internet of Things) cloud refers to any number of cloud services that power the IoT. These include the underlying infrastructure needed for processing and storing IoT data, whether in real time or not. IoT cloud also includes the services and standards necessary for connecting, managing, and securing different IoT devices and applications. As with other types of cloud services, such as software-as-a-service, organizations consume IoT cloud services as they need them, rather than building a datacenter or other on-premises infrastructure to deliver those services locally.
Recently, I found a very useful IoT Cloud platform that allows users to stream sensor data from their Edge devices such as the Raspberry Pi, Arduino, and Jetson Nano to the Cloud uBeac is a versatile IoT platform for centralized digital transformation, data integration, and visualization. uBeac’s IoT hub allows you to connect, process, and visualize real-time data in a secure way. Build an enterprise IoT solution that securely scales to millions of devices. LEARN MORE .
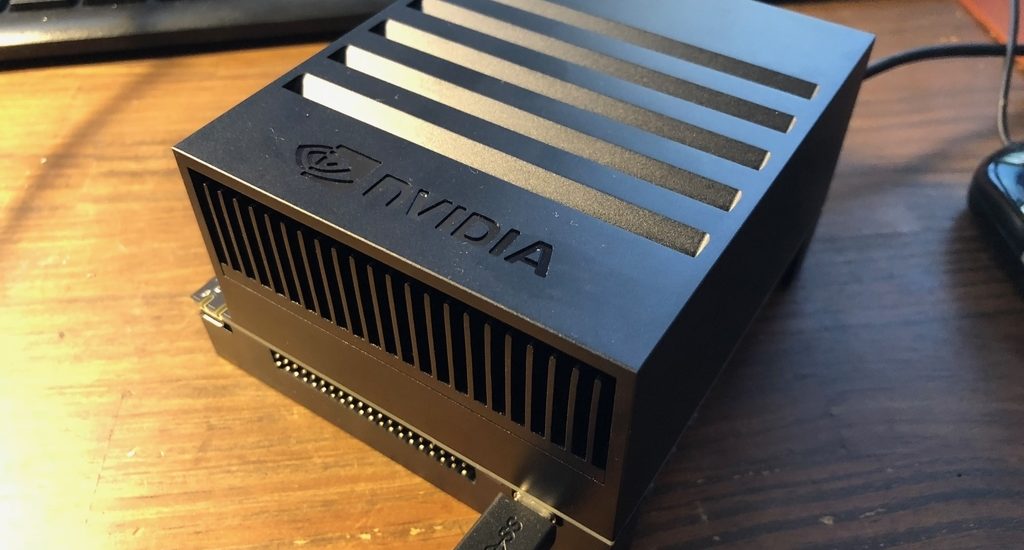
The binding process is very straight forward: create a network, bind devices to the network, and receive data. In this article, we will walk through how you can utilize IoT Cloud Platform for your IoT devices. We will be using a Jetson Nano DevKit as an example to show the complete binding process.
Why IoT Cloud?
IoT cloud offers a more efficient, flexible, and scalable model for delivering the infrastructure and services needed to power IoT devices and applications. The IoT is virtually limitless in scale, unlike most organizations’ resources. The cloud computing model effectively offers that kind of on-demand hyperscale, and it can do so in a cost-effective manner. IoT cloud enables organizations to leverage the significant potential of IoT without having to build the underlying infrastructure and services from scratch. IoT cloud also helps promote and ensure standardization in key areas, including how devices communicate with each other, device management, and security.
The key aspect of using IoT Cloud Services is that you may monitor your devices from anywhere in the world, as long as your IoT devices are bound to the platform and connected to the Internet.
Network Knowledge
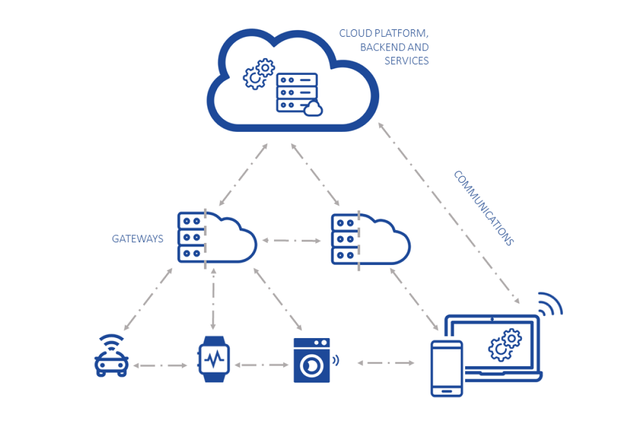
Overview of the top-level components
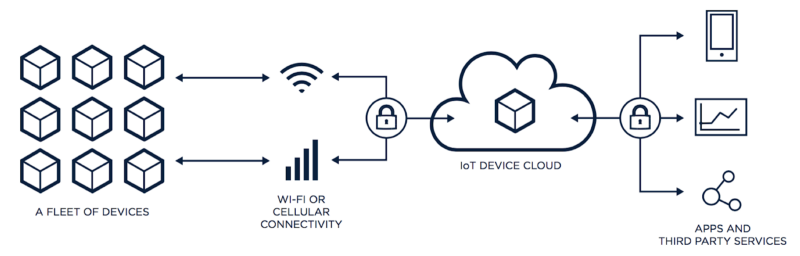
Here we divide the system into three basic components, the Device, Gateway, and Cloud
A device includes hardware and software that directly interact with the world. Devices connect to a network to communicate with each other, or to centralized applications. Devices might be directly or indirectly connected to the internet.
A gateway enables devices that are not directly connected to the Internet to reach cloud services. Although the term gateway has a specific function in networking, it is also used to describe a class of devices that processes data on behalf of a group or cluster of devices. The data from each device is sent to Cloud Platform, where it is processed and combined with data from other devices, and potentially with other business-transactional data.
Each device can provide or consume various types of information. Each form of information might best be handled by a different backend system, and each system should be specialized around the data rate, volume, and preferred API. This section lists and describes common categories of information found in IoT scenarios.
In today’s example, we will be using the GET API with HTTP protocol to stream data to the cloud. If you are not familiar with the RESTful API, you might want to check it out here .
Dataflow
Dataflow is a fully managed streaming analytics service that minimizes latency, processing time, and cost through autoscaling and batch processing. With its serverless approach to resource provisioning and management, you have access to virtually limitless capacity to solve your biggest data processing challenges, while paying only for what you use.
Difference between GET and POST method in HTTP
Both GET and POST method are used to transfer data from client to server in HTTP protocol but Main difference between POST and GET method is that GET carries request parameter appended in URL string while POST carries request parameter in message body which makes it more secure way of transferring data from client to server in http protocol.
Reference: https://cloud.google.com/solutions/iot-overview
Sign up IoT Cloud with uBeac
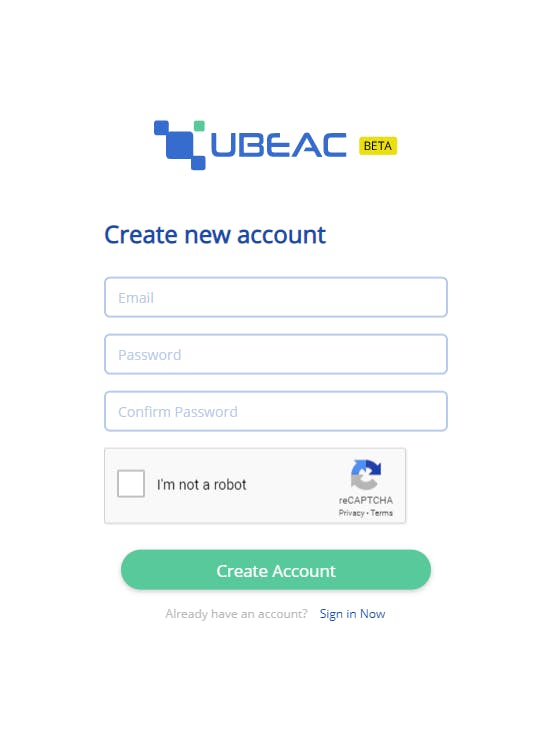
Signing up with uBeac is easy. You just need to add your email and create a password to get started. Next, you must create a team. This is also very simple, involving just a name for the team, a code name, and an address. Once you have finished this, you will arrive at a blank homepage for your team.
Create a new Account and a Team
Set up uBeac
Now that you have your team set up, you need to create a gateway to connect all of your devices.
Create a gateway
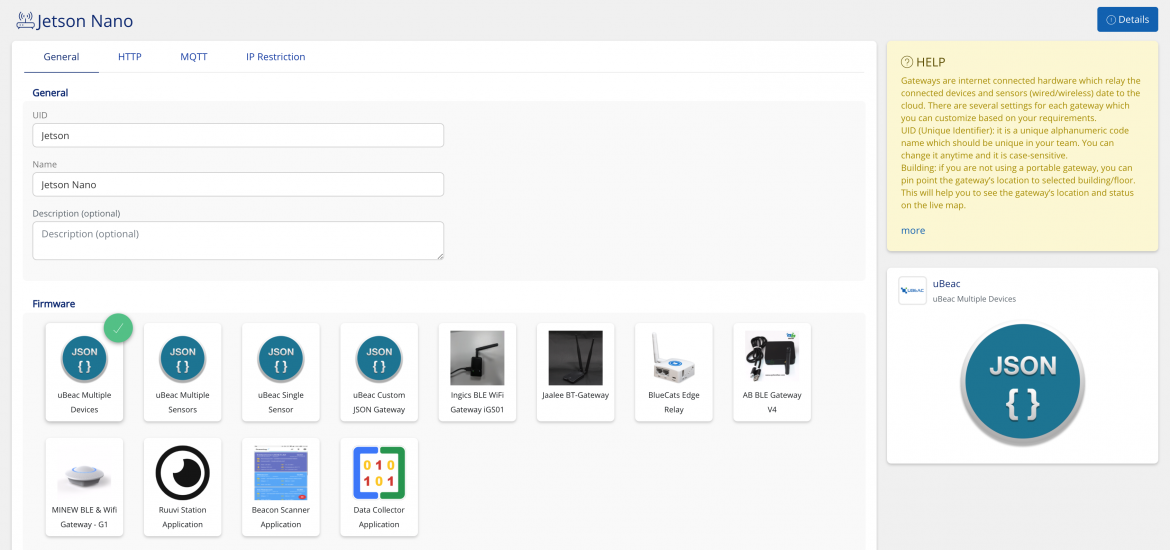
From the uBeac homepage, click on the Gateways module and add a new gateway. Under the General tab, assign a UID and name for your gateway. For your purpose of this tutorial, select uBeac Multiple Devices to be your gateway.
Next, under the HTTP tab, there are two gateway URLs: one HTTP and one HTTPS. These will be used to connect to your computer. Click submit to add the gateway.
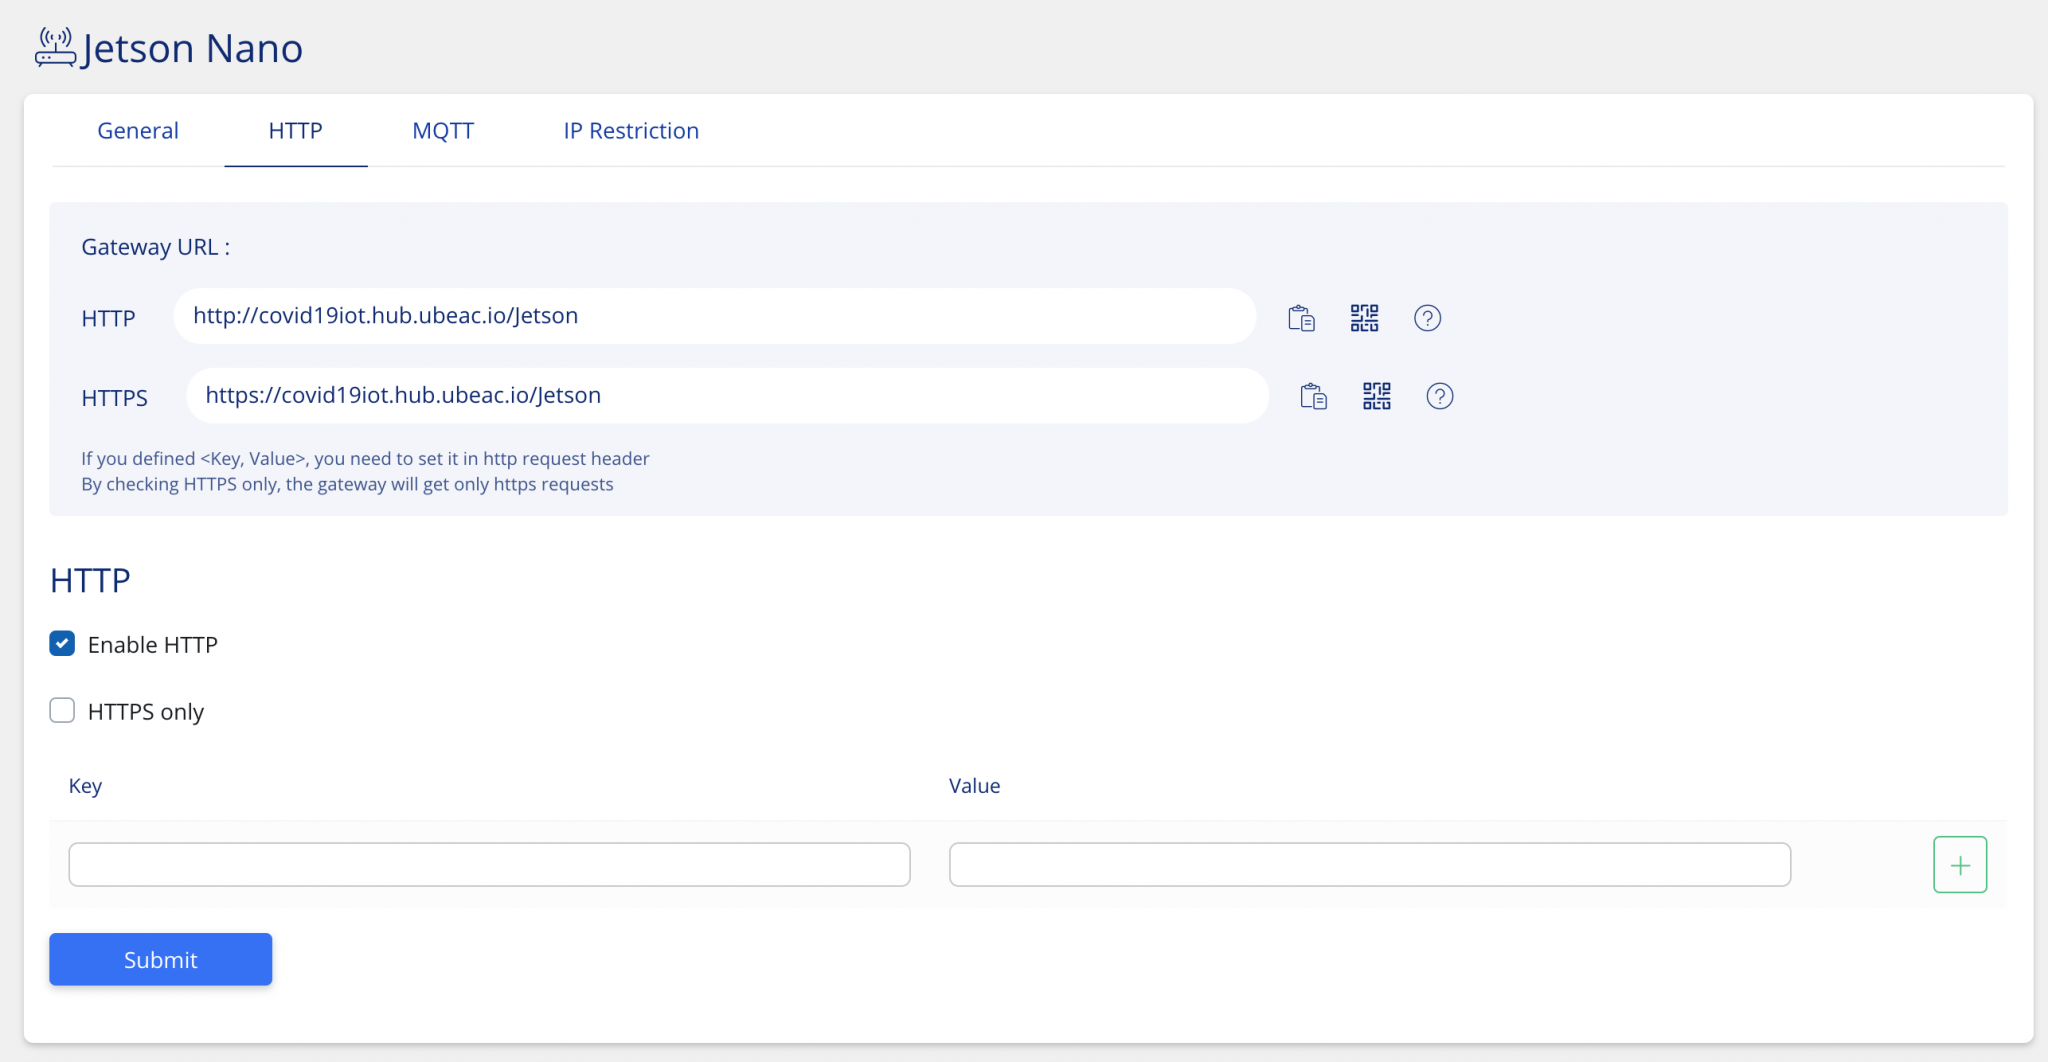
Under the Gateway tab on the left colmn, you should be able to find the gateway that you just created.

Set up your IoT Device
Access uBeac’s GitHub Repo and select OSMonitoring. Inside is a Python program that will conduct OS monitoring when running on Iot Device.
To simplify the setup, you may use the following commands to finish up.
1$ cd ${HOME}
2$ pip install psutil speedtest-cli httpd python-http-client
3$ git clone https://github.com/ubeac/OSMonitoring
4$ mkdir iot-cloud
5$ cp -r OSMonitoring/OSMonitoring-Linux/* iot-cloud/
6$ cd iot-cloud
7$ nano main.py
If all goes well, your main.py code should look something like this (with possibly a different Gateway URL, Device Friendly Name, and Sent Interval).
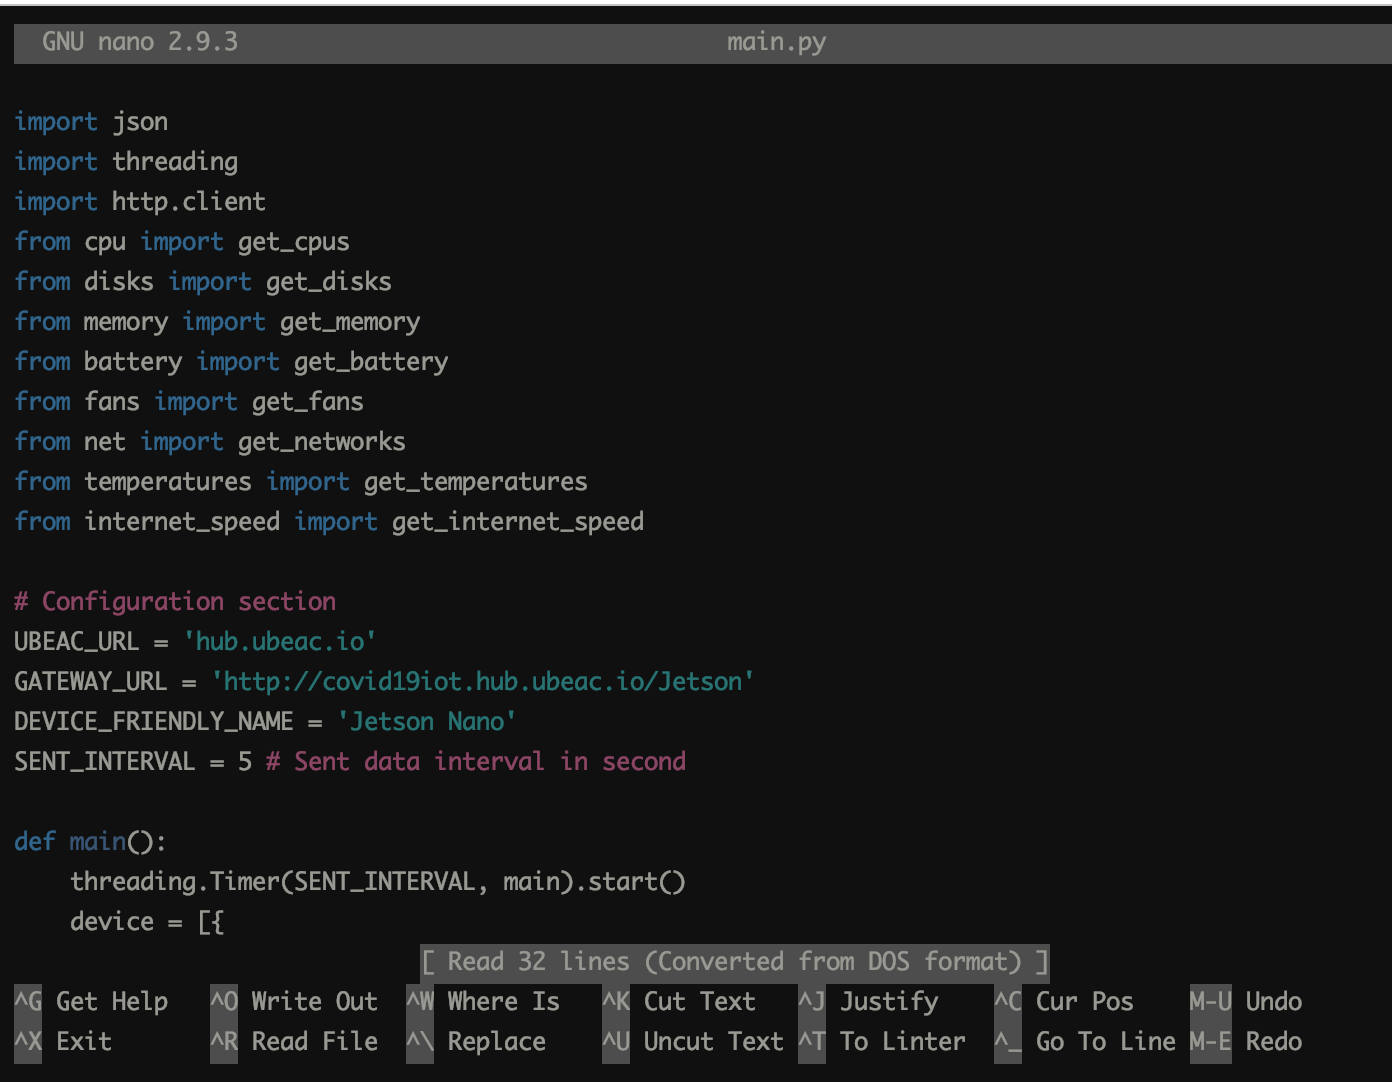
You need to update the following parameters:
Notes: You may find the parameters on your gateway, update them properly. Please use the parameters defined on your gateway, do not overwrite them. Otherwise, you won’t see any data streaming to your Cloud Platform
1UBEAC_URL = 'hub.ubeac.io'
2GATEWAY_URL = 'GATEWAY_URL'
3DEVICE_FRIENDLY_NAME = 'DEVICE_NAME'
4
5# The DEVICE_FRIENDLY_NAME should be the DEVICE_NAME, NOT the UID.
6# The GATEWAY_URL is the one with the http, unless you enabled the https.
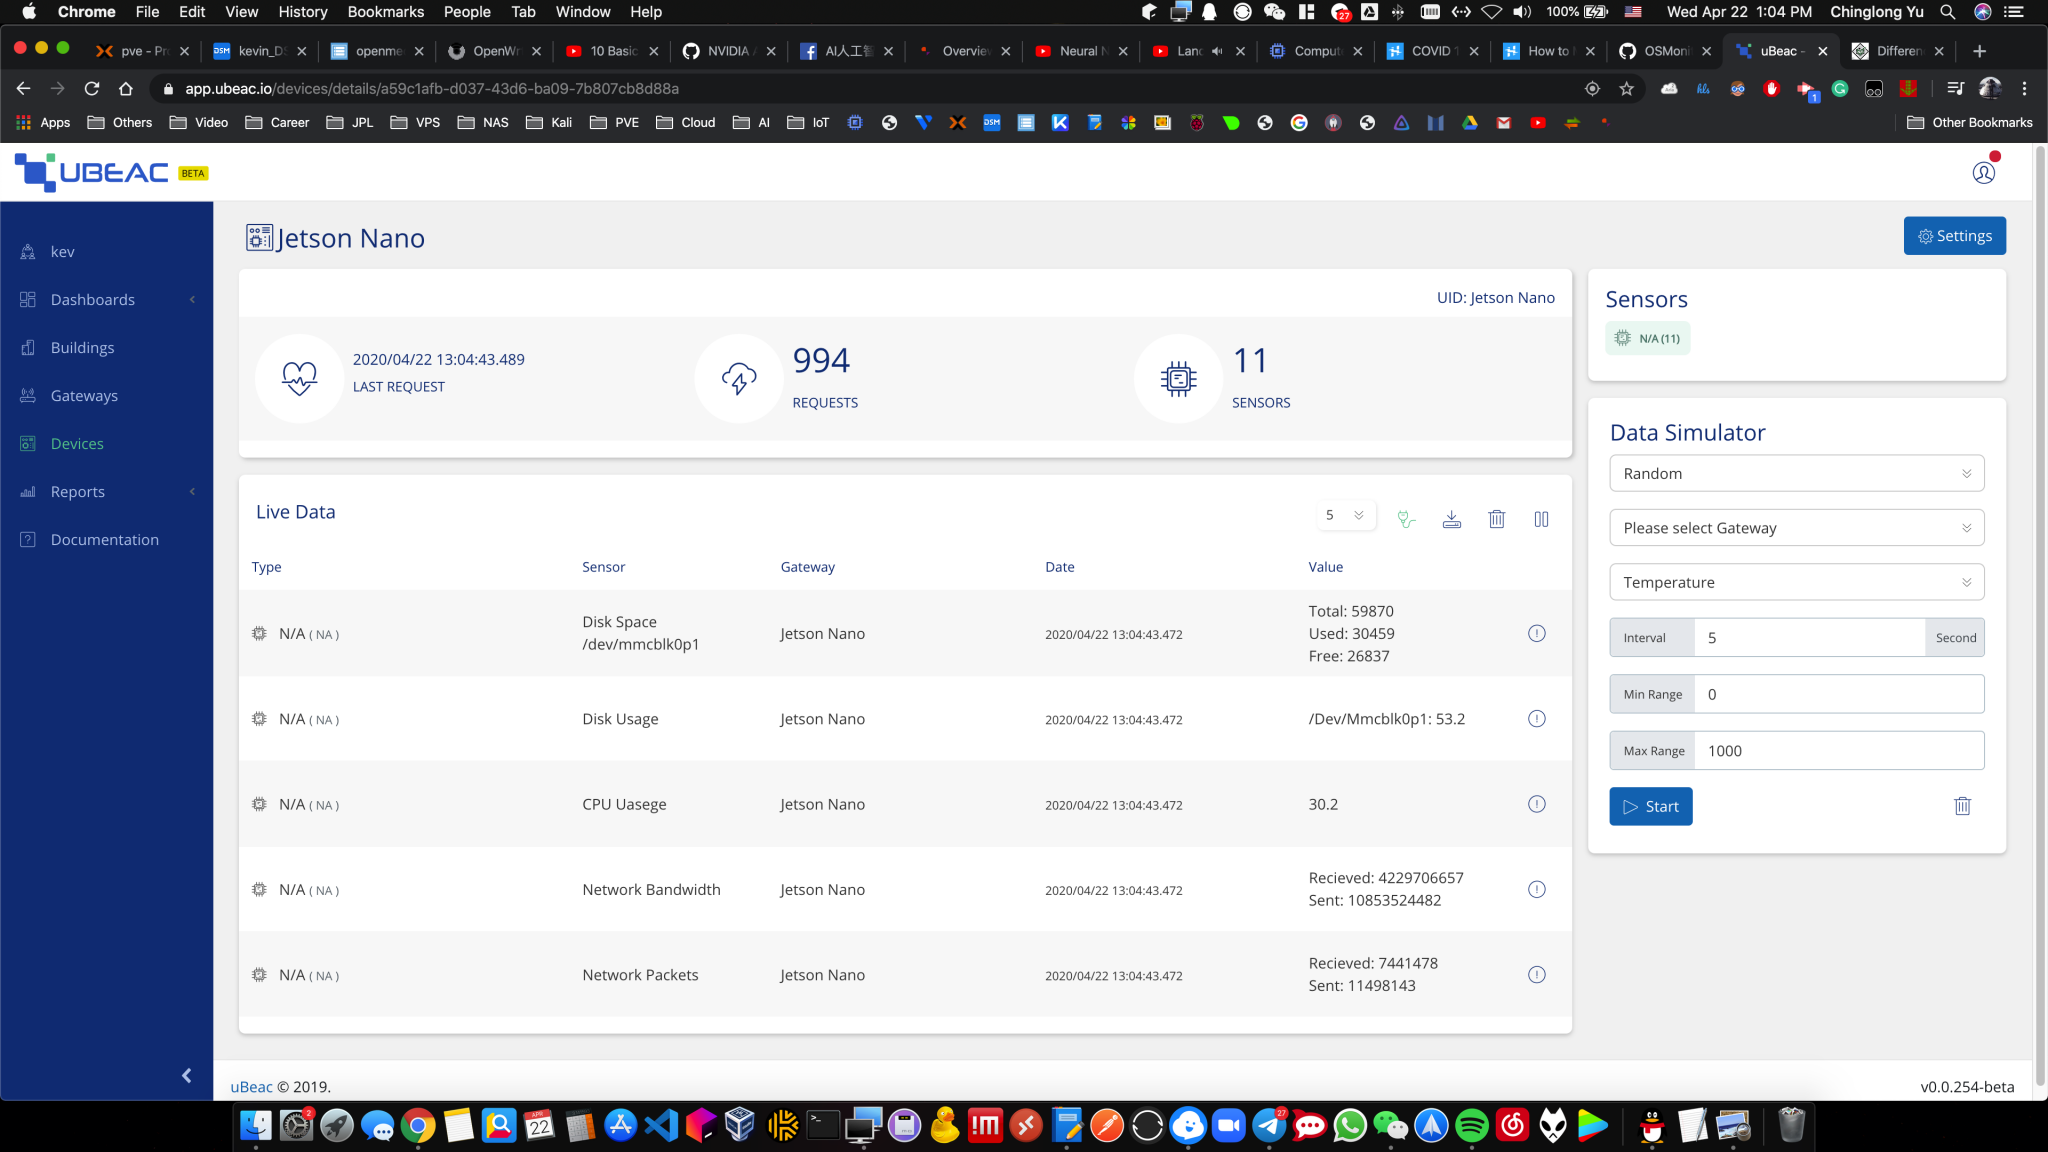
Receive Data
i. Run main.py
ii. Go to the gateway info page and you should see the live requests. You can click on the info icon for each request to see the sensors’ data.
iii. Go to the devices page. You should see a device with name: your device friendly name.
iv. Update the details for the sensors (units,…)
Go to dashboard and drag & drop an indicator. In the setting for the indicator, select the sensor you want to show data.
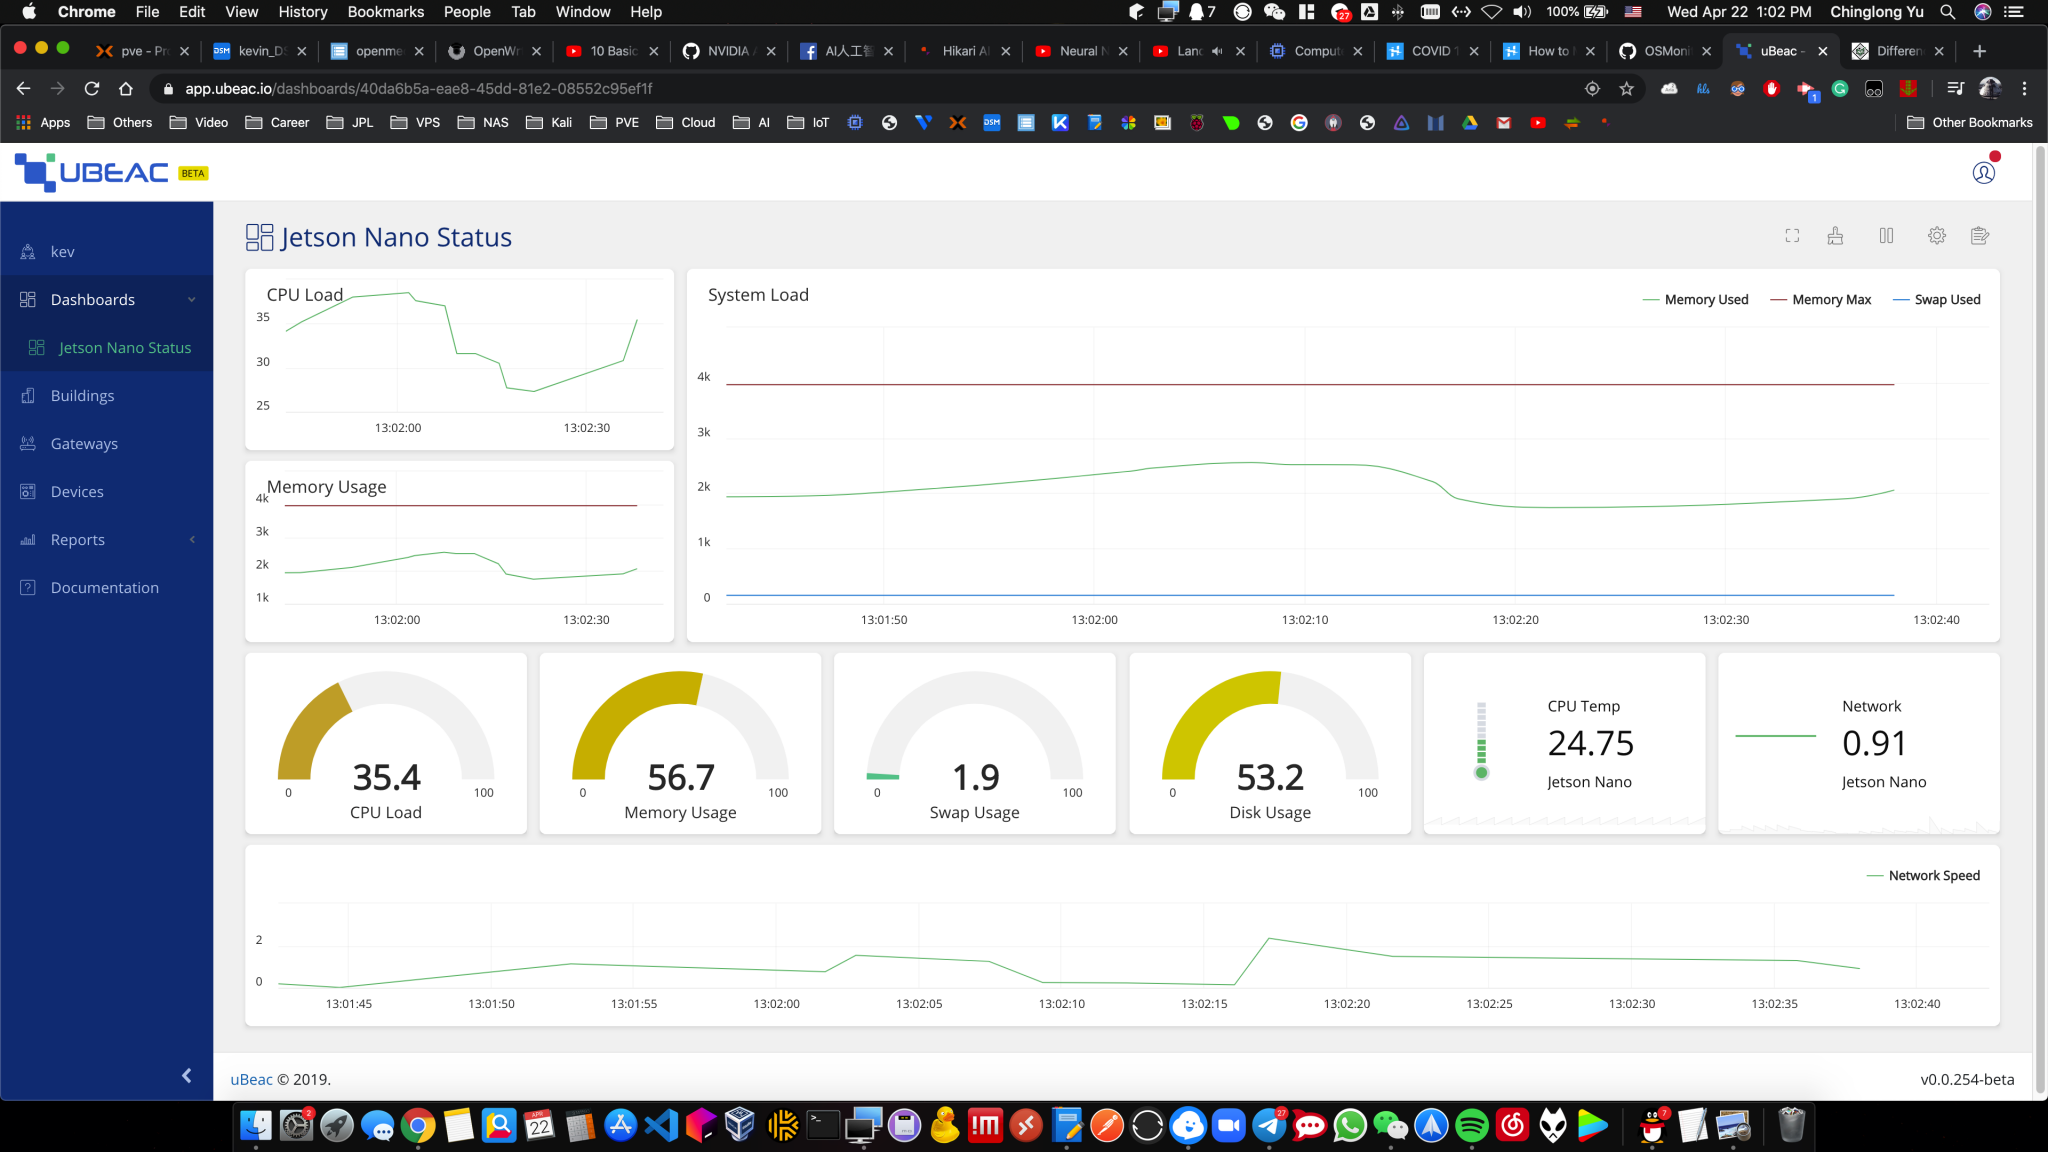
Under the device tab on the right column, then select your device. If you set up everything properly, you should have the same results shown below:
Setup a Dashboard for your IoT device
Having a dashboard to visualize your incoming data is really useful, especially if you want to analyze and utilize the data afterwards. First, you must setup the dashboard. Go to the Dashboards module and add a new dashboard. Pick a name for the dashboard then click submit. A blank dashboard will appear, which you can customize however you want. On the top right corner of the dashboard page, click the clipboard icon to start editing the dashboard.
You can select widgets such as indicators, charts, and device tracker to help you visualize your data. For example, if you were to make an indicator for the computers CPU Temperature sensor you would first drag and drop the indicator widget onto the dashboard. Next, you would click the “connect to data” button to edit the widget’s settings. This includes changing the display icon, selecting the device to collect data from, and other features that are unique to each widget. Once you are satisfied with your widget, save your progress. You can continue doing this for as many widgets as you would like.
Below is an example of dashboards that you can make with just the sensors on your IoT device.

You may play around with the dashboard to explore more functionalities, it is really fun.
Conclusion
This is how you can use uBeac to create a monitoring system for all of your IoT Edge devices. You can have a monitoring system for each device, or you can add all of your devices into one dashboard. However, what you want to monitor your devices is completely up to you when you use uBeac .
That’s all for this tutorial, I hope you could find something useful for your IoT projects. Enjoy !
 Kevin Yu